Bathroom Vanity Lighting Ideas to Transform Your Space
Your bathroom vanity deserves lighting that works as hard as you do. The right vanity light transforms morning routines and evening wind-downs into comfortable experiences. Whether you’re applying makeup, shaving, or simply washing your hands, proper bathroom lighting makes every task easier.
Bathroom vanity lights do more than illuminate. They set the mood, complement your design style, and add value to your home. From sleek LED fixtures to timeless glass shades, today’s options blend function with beauty.
This guide walks you through everything you need to know about choosing bathroom vanity lighting. You’ll discover popular styles, understand different fixture types, and learn practical installation tips. Let’s find the perfect light for your space.
Why Bathroom Vanity Lighting Matters
The bathroom mirror becomes your daily companion. You check your appearance, groom yourself, and prepare for the day ahead. Poor lighting creates shadows on your face and makes simple tasks frustrating.
Quality vanity lighting eliminates shadows and provides even illumination. Your bathroom becomes a functional space where you can see clearly. This matters whether you’re a makeup enthusiast or someone who values a quick, efficient routine.
Pro Tip: Position vanity lights at eye level on both sides of your mirror for the most flattering, shadow-free illumination.
Beyond function, bathroom light fixtures contribute to your room’s overall design. A stunning vanity light acts as a focal point. It pulls together your design elements and creates visual interest above your bathroom vanity.
Your bathroom’s style guides your lighting choice. Each design aesthetic pairs beautifully with specific fixture types. Understanding these styles helps you narrow down options and find the perfect match for your space.
The right style creates harmony between your vanity, mirror, and overall bathroom design. Let’s explore the most popular options available today.
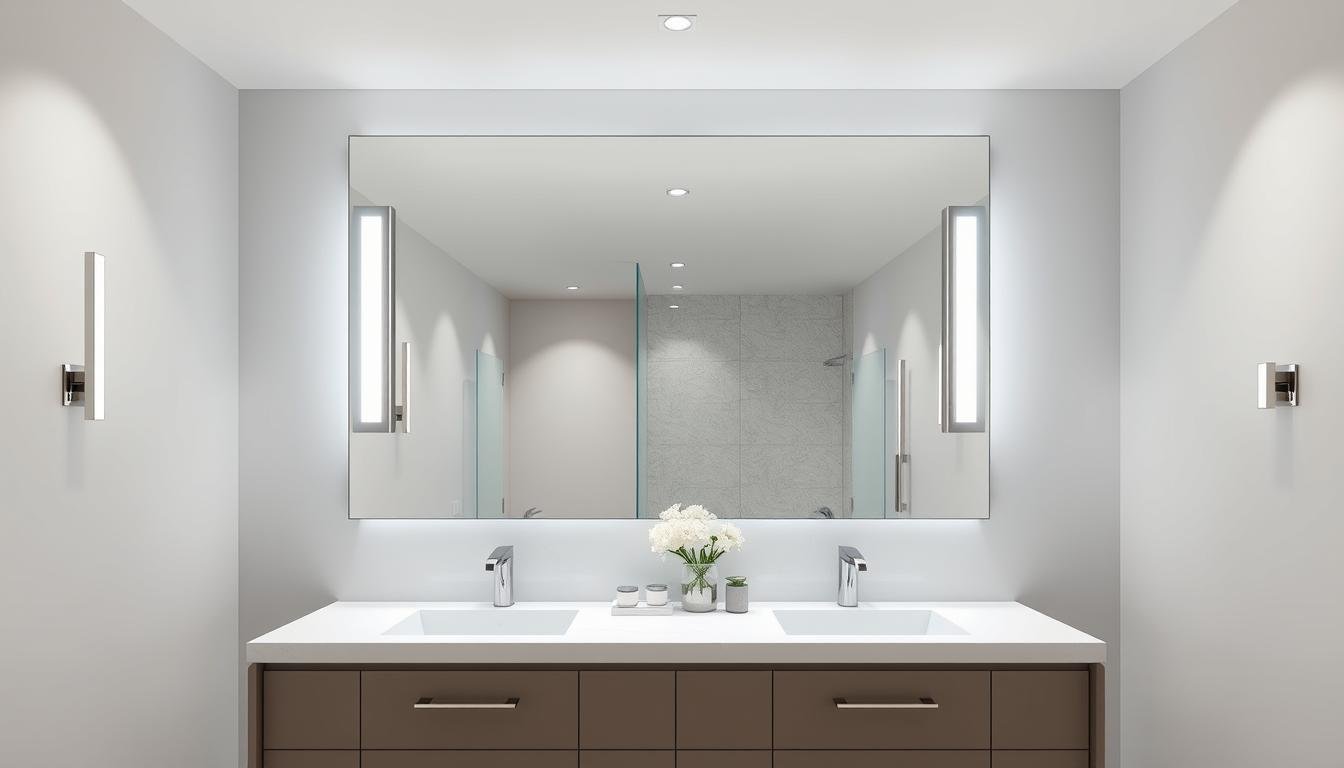
Modern and Contemporary Vanity Lights
Modern bathroom vanity lights embrace clean lines and minimalist design. These fixtures often feature geometric shapes, metallic finishes, and integrated LED technology. Chrome, brushed nickel, and matte black dominate the color palette.
Contemporary designs work perfectly in updated bathrooms. They pair well with floating vanities, frameless mirrors, and neutral color schemes. The simplicity creates an uncluttered, sophisticated look.
LED Vanity Light Bars
Horizontal LED fixtures provide even, energy-efficient illumination. These sleek designs mount easily above mirrors and offer long-lasting performance.
Geometric Fixtures
Angular shapes and bold lines make a statement. Matte black finishes add drama while maintaining modern sensibility.
Minimalist Sconces
Wall-mounted fixtures on either side of the mirror provide flattering light. Chrome and nickel finishes complement modern bathroom fixtures.
Traditional and Classic Bathroom Lights
Traditional vanity lighting brings timeless elegance to your bathroom. These fixtures often incorporate glass shades, decorative details, and warm metal finishes like oil-rubbed bronze or antique brass.
Classic designs suit homes with traditional architecture. They pair beautifully with framed mirrors, marble countertops, and detailed cabinetry. The ornate elements add sophistication and charm.
Opal glass shades diffuse light softly for gentle illumination
Farmhouse bathroom lighting captures casual, comfortable style. These fixtures often feature exposed bulbs, distressed finishes, and industrial-inspired elements. Wood accents and matte black metal create authentic character.
Rustic vanity lights work well in country homes and modern farmhouse designs. They add personality to bathroom spaces and create a welcoming atmosphere. The unpretentious style feels both current and timeless.
Mason Jar Fixtures
Glass mason jar shades bring nostalgic charm to your bathroom vanity. These fixtures often incorporate wood backplates and exposed Edison bulbs for authentic farmhouse appeal.
Industrial Cage Lights
Wire cage designs add industrial edge to farmhouse bathrooms. Matte black metal construction pairs perfectly with white subway tile and reclaimed wood elements.
Industrial and Urban Bathroom Fixtures
Industrial vanity lighting embraces raw materials and utilitarian design. These fixtures showcase metal construction, exposed hardware, and architectural elements. The aesthetic works in urban lofts and contemporary spaces.
The industrial look combines function with distinctive style. Fixtures often feature adjustable arms, pipe-style construction, and vintage Edison bulbs. The result feels authentic and purposeful.
Create an Industrial Look
Find industrial-style vanity lighting that brings urban sophistication and raw appeal to your bathroom design.
LED vanity light technology has transformed bathroom lighting. These energy-efficient fixtures offer significant advantages over traditional bulb options. Understanding LED benefits helps you make informed decisions for your space.
Modern LED fixtures provide excellent light quality while reducing energy consumption. The technology continues improving, offering better color rendering and longer lifespans than ever before.
LED Lighting Advantages
Energy efficiency reduces electricity costs significantly
Long lifespan means fewer replacements needed
Cool operation prevents heat buildup in bathroom
Instant full brightness without warm-up time
Excellent color rendering for accurate appearance
Dimmable options available for mood control
Compact design enables sleek fixture styles
Considerations
Higher upfront cost than traditional fixtures
Color temperature selection important for comfort
Some LED fixtures not compatible with dimmers
Quality varies between manufacturers significantly
Choosing the Right LED Color Temperature
LED color temperature affects your bathroom’s ambiance and functionality. Measured in Kelvin, this specification determines whether light appears warm or cool. The right choice depends on your preferences and bathroom design.
Warm white LEDs create cozy, relaxing environments. Cool white options provide crisp, energizing illumination. Many homeowners prefer neutral white for bathroom vanity lighting as it balances comfort with accurate color rendering.
LED Color Temperature Guide
Warm White (2700K-3000K): Soft, yellowish light similar to incandescent bulbs, ideal for relaxing atmosphere
Neutral White (3500K-4100K): Balanced light for accurate color rendering, best for makeup application
Cool White (5000K-6500K): Bright, bluish light for task-oriented spaces, energizing effect
Integrated vs. Bulb-Based LED Fixtures
LED bathroom vanity lights come in two main categories. Integrated LED fixtures have built-in lights that cannot be replaced separately. Bulb-based fixtures accept standard LED bulbs that you can change as needed.
Integrated designs offer sleek profiles and optimal LED performance. Bulb-based options provide flexibility for future upgrades and easier repairs. Consider your priorities when choosing between these approaches.
Integrated LED Fixtures
Ultra-slim, modern design profiles
Optimized LED performance and efficiency
Long lifespan (typically 25,000-50,000 hours)
Entire fixture replacement when LEDs fade
Bulb-Based LED Fixtures
Standard light bulb sockets for flexibility
Easy bulb replacement when needed
Upgrade to newer LED technology later
Wider variety of fixture styles available
Vanity Light Placement and Sizing Guide
Proper placement makes the difference between flattering illumination and frustrating shadows. The position and size of your bathroom vanity lights directly impact functionality and appearance. Follow these guidelines for optimal results.
Your mirror size, ceiling height, and vanity dimensions all influence ideal placement. Taking time to plan ensures your lighting investment delivers maximum benefit.
Height and Positioning Standards
Mount vanity lights at face level for the most flattering illumination. This typically means positioning fixtures between 65 and 70 inches from the floor. The exact height depends on the users’ heights and mirror placement.
For fixtures mounted above the mirror, place them about 75 to 80 inches from the floor. This provides adequate clearance while directing light downward onto the vanity and user.
Important: Always verify your local electrical codes before installation. Some jurisdictions have specific requirements for bathroom lighting placement, especially near water sources.
Sizing Your Bathroom Vanity Lighting
The fixture size should relate to your mirror and vanity dimensions. A light that’s too small gets lost visually, while an oversized fixture overwhelms the space. Balance creates the most pleasing effect.
For fixtures mounted above the mirror, aim for a width approximately 75 percent of the mirror width. This proportion looks balanced without dominating the wall. Side sconces should align with the outer edges of the mirror.
Vanity Width
Recommended Light Width
Bulb Count
Alternative: Side Sconces
24-36 inches
18-24 inches
2-3 bulbs
1 sconce per side
37-48 inches
24-36 inches
3-4 bulbs
1-2 sconces per side
49-60 inches
36-48 inches
4-5 bulbs
2 sconces per side
60+ inches (double sink)
Two separate fixtures
3-4 bulbs each
2-3 sconces per sink area
Single vs. Double Vanity Lighting
Double vanities require thoughtful lighting design. You can choose one long fixture spanning both sinks or separate fixtures for each area. The decision affects both function and aesthetics.
Separate fixtures for each sink provide individual control and balanced illumination. A single long fixture creates visual continuity but may create uneven lighting in the center area between sinks.
Dual fixtures offer personalized lighting control for each user
Centered fixtures work well with single large mirrors
Side sconces provide the most flattering illumination for each person
Symmetry creates visual harmony in double vanity designs
Find the Perfect Size Fixture
Explore bathroom vanity lights in various sizes to match your mirror and vanity dimensions perfectly.
The finish of your vanity lighting affects your bathroom’s overall aesthetic. Metal finishes range from bright chrome to warm brass, each creating a distinct visual impact. Your choice should coordinate with existing bathroom fixtures and hardware.
Consider durability alongside appearance. Bathroom environments expose fixtures to moisture and temperature changes. Quality finishes resist corrosion and maintain their appearance over time.
Popular Metal Finishes
Chrome and Polished Nickel
Bright, reflective finishes add sparkle to bathrooms. Chrome offers cool, modern appeal while polished nickel provides slightly warmer tones. Both resist moisture and clean easily.
Brushed Nickel
This versatile finish suits almost any bathroom style. The matte texture hides fingerprints and water spots better than polished options. Brushed nickel complements both warm and cool color palettes.
Matte Black
Bold and contemporary, matte black creates dramatic contrast in bathrooms. This trending finish pairs beautifully with white fixtures and modern design elements. The flat surface resists showing water spots.
Oil-Rubbed Bronze
Traditional and warm, oil-rubbed bronze adds old-world charm. The dark finish with lighter highlights creates depth and character. This choice works perfectly in classic bathroom designs.
Brass and Gold
Luxurious and timeless, brass brings warmth to bathroom spaces. Available in polished, brushed, or aged finishes. This classic metal creates elegant, upscale ambiance.
Satin Nickel
Softer than brushed nickel, satin nickel offers a pearl-like appearance. The subtle finish coordinates easily with various design styles while maintaining a sophisticated look.
Glass Shade Options
Glass shades affect both light quality and fixture appearance. Clear glass showcases decorative bulbs and provides maximum brightness. Frosted or opal glass diffuses light softly, reducing glare and creating ambient illumination.
The shade material influences your bathroom’s atmosphere. Textured glass adds visual interest while still diffusing light. Consider how much direct light versus soft glow you prefer in your space.
Clear Glass Shades
Maximum light output and brightness
Showcase decorative Edison or vintage bulbs
Create sparkle and visual interest
May produce glare without proper bulb selection
Easy to clean and maintain
Opal Glass Shades
Soft, diffused light reduces harsh shadows
Gentle on eyes, comfortable illumination
Classic appearance suits many styles
Hides less attractive bulb designs
Most popular choice for bathroom vanity
Seeded or Textured Glass
Unique decorative appearance
Adds character and personality
Diffuses light while maintaining sparkle
Works well in farmhouse and traditional designs
May require more frequent cleaning
Installation Tips and Considerations
Installing bathroom vanity lighting requires basic electrical knowledge and attention to safety. While many homeowners tackle this project themselves, understanding when to call a professional ensures safe, code-compliant results.
Proper installation affects both safety and performance. Taking time to do the job correctly prevents future problems and ensures your new lighting functions as intended.
DIY vs. Professional Installation
Simple fixture replacements suit confident DIYers with basic electrical experience. If you’re replacing an existing light with a similar fixture, the process typically involves straightforward wire connections and mounting.
Complex installations require professional help. This includes moving electrical boxes, adding new circuits, or installing fixtures in new locations. Licensed electricians ensure work meets local codes and safety standards.
When to Call a Professional Electrician:
Installing lighting where none existed previously
Relocating electrical boxes or adding new circuits
Working with complex three-way or dimmer switch wiring
Any installation you don’t feel completely confident performing
When local codes require licensed electrician installation
Essential Safety Guidelines
Safety must come first with any electrical work. Bathroom environments present additional moisture concerns that require extra caution. Always turn off power at the circuit breaker before beginning work.
Use a voltage tester to confirm power is off before touching any wires. This simple step prevents dangerous shocks. Never assume a switch position indicates whether power flows to a fixture.
Critical Safety Reminder: Bathroom lighting installations must comply with local electrical codes regarding moisture protection and GFCI requirements. Improper installation can create serious shock hazards in wet environments.
Basic Installation Steps
Most vanity light installations follow similar basic steps. Start by removing the old fixture after confirming power is off. Then prepare the electrical box and install the new mounting hardware.
Connect wires according to the manufacturer’s instructions. Typically, this means matching black to black, white to white, and green or bare copper to ground. Secure connections with appropriate wire connectors and wrap with electrical tape.
Turn off power at the circuit breaker and confirm with voltage tester
Remove the old fixture and inspect the electrical box condition
Install the new mounting bracket according to fixture instructions
Connect wires using wire nuts: black to black, white to white, ground to ground
Carefully tuck wired connections into the electrical box
Attach the fixture to the mounting bracket securely
Install bulbs or shades as directed by manufacturer
Restore power and test the fixture operation
Tools and Materials Needed
Having the right tools makes installation easier and safer. Most homeowners already own basic items like screwdrivers and pliers. A few specialized tools help ensure professional-quality results.
Basic Tools Required
Screwdrivers (flathead and Phillips)
Wire strippers for preparing connections
Voltage tester for safety confirmation
Pliers for wire manipulation
Ladder or step stool for safe access
Helpful Materials
Wire nuts in appropriate sizes
Electrical tape for extra security
Light bulbs if not included with fixture
Mounting hardware (usually included with fixture)
Safety glasses for eye protection
Get Your Installation Supplies
Find essential tools and materials for safe, successful bathroom vanity light installation.
Creating a cohesive bathroom design requires coordinating various elements. Your vanity lighting should harmonize with faucets, cabinet hardware, towel bars, and other metal fixtures. Consistency in finish creates visual flow.
You don’t need exact matches for every element. Instead, aim for complementary finishes that work together. Mixing metals intentionally can add depth and interest to your design when done thoughtfully.
Matching Metal Finishes
Selecting the same finish for major fixtures creates a unified look. If your faucet features brushed nickel, choosing brushed nickel vanity lights reinforces your design intent. This approach works especially well in smaller bathrooms where too much variety feels cluttered.
Consider finish families rather than exact matches. Chrome and polished nickel pair beautifully together. Oil-rubbed bronze coordinates with matte black. These combinations provide variety while maintaining visual harmony.
Mirror and Lighting Integration
Your bathroom mirror and vanity light work as a team. The mirror reflects and amplifies the light while the fixture provides functional illumination. Considering both elements together ensures optimal results.
Frameless mirrors offer flexibility with any lighting style. Framed mirrors should coordinate with your fixture finish for a pulled-together appearance. Some integrated mirror-light combinations eliminate coordination concerns entirely.
Side-Mounted Lights
Sconces flanking the mirror provide the most flattering illumination. This placement eliminates shadows on the face and creates even lighting. Mount sconces 28 to 36 inches apart for single-user vanities.
Side lighting works best with centered mirrors. The symmetry creates visual balance while delivering functional benefits. This classic arrangement suits bathrooms of any size or style.
Over-Mirror Fixtures
Horizontal lights mounted above mirrors suit spaces where wall mounting isn’t possible. This popular approach works with medicine cabinets and windows flanking vanities. Choose a fixture width that balances with the mirror size.
Over-mirror lighting provides good general illumination but may create slight shadows. Combining an overhead fixture with ambient bathroom lighting improves overall visibility.
Complementing Your Bathroom Style
Your overall bathroom design guides appropriate lighting choices. A modern bathroom calls for sleek, minimalist fixtures. Traditional spaces benefit from ornate details and classic finishes. Matching your lighting to the room’s character creates intentional, professional-looking design.
Consider the bigger picture beyond individual elements. How does your vanity lighting relate to ceiling fixtures, wall sconces in other areas, and even hardware on your shower door? Thoughtful coordination elevates the entire space.
Modern bathrooms pair well with LED fixtures and geometric designs
Traditional spaces benefit from glass shades and decorative details
Transitional bathrooms allow mixing contemporary and classic elements
Coastal themes work beautifully with chrome or brushed nickel finishes
Spa-inspired designs favor soft, diffused lighting and natural materials
Maintaining Your Bathroom Vanity Lighting
Proper maintenance extends the life of your bathroom lighting and keeps fixtures looking their best. Bathroom environments expose lights to moisture, dust, and product residue. Regular cleaning prevents buildup and maintains optimal light output.
Simple care routines take just minutes but make a significant difference. Your investment deserves protection through basic maintenance practices.
Regular Cleaning Tips
Clean glass shades and metal finishes regularly to prevent stubborn buildup. Turn off power to fixtures before cleaning. Use appropriate cleaning methods for different materials to avoid damage.
Gentle approaches work best for most bathroom light fixtures. Harsh chemicals can damage finishes or cloud glass shades. Simple solutions often prove most effective for routine maintenance.
Glass Shade Care
Remove glass shades periodically for thorough cleaning. Wash in warm, soapy water and dry completely before reinstalling. This prevents water spots and removes accumulated grime.
For fixed glass elements, wipe with a damp microfiber cloth followed by dry buffing. Glass cleaner works well for stubborn spots but avoid overspray on metal parts.
Metal Finish Maintenance
Dust metal fixtures regularly with a soft, dry cloth. For deeper cleaning, use a slightly damp cloth and immediately dry the surface. Moisture left on metal can cause spotting or tarnish.
Avoid abrasive cleaners that scratch protective finishes. Most metal fixtures need only gentle wiping to maintain their appearance. Special metal polishes rarely benefit modern finishes.
Bulb Replacement and Upgrades
Replace burned-out bulbs promptly to maintain balanced illumination. Uneven lighting becomes noticeable when some bulbs fail in multi-bulb fixtures. Keep spare bulbs on hand for quick replacements.
Consider upgrading to LED bulbs if your fixture uses traditional incandescent or CFL bulbs. LED replacements offer energy savings and longer life. Verify the fixture is compatible with LED bulbs before switching.
Bulb Replacement Best Practices:
Always turn off power and allow bulbs to cool before handling
Replace all bulbs simultaneously in multi-bulb fixtures for consistent color
Check wattage limits marked on the fixture to avoid overheating
Handle bulbs by the base, not the glass, to prevent oil transfer
Dispose of old bulbs properly, especially CFLs containing mercury
Addressing Common Issues
Bathroom vanity lights occasionally develop problems. Flickering, dimming, or complete failure signal issues requiring attention. Understanding common problems helps you address them quickly.
Many issues have simple solutions while others require professional help. Knowing the difference saves time and ensures safety.
Why do my vanity lights flicker?
Flickering often indicates loose bulbs, incompatible dimmer switches with LED bulbs, or loose wire connections. Try tightening bulbs first. If flickering persists with LED bulbs, verify your dimmer switch is LED-compatible. Consistent flickering across all bulbs may indicate electrical issues requiring professional inspection.
How do I remove water spots from glass shades?
Mix equal parts white vinegar and water in a spray bottle. Spray the solution on glass shades and let sit for a few minutes. Wipe with a microfiber cloth and buff dry. For stubborn mineral deposits, use a paste of baking soda and water, gently rub, then rinse and dry thoroughly.
Can I use any bulb in my vanity light fixture?
No, always follow the manufacturer’s specifications for bulb type and maximum wattage. Exceeding wattage limits creates fire hazards. Check the label inside the fixture or consult the installation manual. LED bulbs typically work in most fixtures but verify compatibility, especially with dimmer switches.
How often should I clean my bathroom vanity lights?
Dust fixtures weekly and perform deeper cleaning monthly. Bathrooms with heavy product use or high humidity may require more frequent attention. Regular maintenance prevents buildup that becomes difficult to remove and maintains optimal light output.
Bathroom Vanity Lighting Budget Guide
Bathroom vanity lighting spans a wide price range. Budget-friendly options deliver basic function while premium fixtures offer superior materials and design. Understanding what influences cost helps you make informed decisions.
Your budget should align with your bathroom’s overall investment level. A modest bathroom update calls for different spending than a luxury remodel. Balance cost with quality to get the best value.
Price Range Overview
Entry-level fixtures start around thirty to fifty dollars. These basic options provide adequate lighting for budget-conscious projects. Mid-range fixtures from seventy-five to two hundred dollars offer better materials and more design options.
Premium vanity lights exceed two hundred dollars and can reach several hundred for designer pieces. These fixtures feature superior craftsmanship, unique designs, and high-end finishes. The investment may prove worthwhile in primary bathrooms or luxury homes.
Price Range
Typical Features
Best For
Expected Quality
$30-$75
Basic designs, standard finishes, simple installation
Rental properties, guest bathrooms, tight budgets
Adequate function, limited style options
$75-$200
Better materials, varied styles, good finish quality
Main bathrooms, moderate renovations, most homeowners
Good durability, attractive designs, solid value
$200-$400
Premium finishes, unique designs, superior construction
Primary bathrooms justify higher lighting investments than guest or powder room spaces. The fixtures you see and use daily deserve quality construction and appealing design. Less-used bathrooms can feature more budget-friendly options.
Focus spending on visible elements that impact daily experience. A beautiful, well-made fixture in your main bathroom provides years of satisfaction. Simple fixtures work perfectly fine in spaces used occasionally.
Worth the Investment
Primary bathroom vanity lighting
Fixtures in prominent, visible locations
LED fixtures for long-term energy savings
Quality finishes that resist bathroom moisture
Unique statement pieces that define your style
Safe to Economize
Guest bathroom or powder room lighting
Temporary fixtures in rental properties
Builder-grade fixtures for quick home flips
Secondary bathrooms used infrequently
Spaces planned for future renovation
Long-Term Value Considerations
Quality fixtures often prove more economical long-term. Better construction resists bathroom moisture and temperature fluctuations. Superior finishes maintain appearance without frequent replacement.
LED fixtures cost more initially but save significantly on energy bills and bulb replacements. Calculate total cost of ownership rather than just purchase price. The savings often justify higher upfront investment.
Find Fixtures Within Your Budget
Discover bathroom vanity lighting options across all price ranges, from budget-friendly basics to premium designer fixtures.
The right bathroom vanity lighting transforms your daily routine. From morning preparations to evening wind-down, quality illumination makes every moment more comfortable and efficient. Your lighting choice reflects your personal style while serving essential functions.
You now understand the key considerations for selecting bathroom vanity lights. Style preferences, LED technology benefits, proper sizing and placement, finish coordination, and budget factors all influence your decision. Armed with this knowledge, you can confidently choose fixtures that enhance your bathroom.
Remember that bathroom lighting impacts both function and aesthetics. Take time to evaluate your specific needs, measure your space accurately, and consider how fixtures coordinate with existing elements. The perfect vanity light awaits to illuminate your bathroom beautifully.
Your bathroom deserves lighting that works as beautifully as it looks. Whether you choose modern LED fixtures, classic traditional styles, or rustic farmhouse designs, the right choice brings your vision to life. Start your lighting transformation today.
Start Your Bathroom Lighting Project
Explore the complete selection of bathroom vanity lighting to find the perfect fixtures for your space and style.
The right bathroom lighting transforms an ordinary space into an extraordinary one, balancing both function and beauty. Whether you’re applying makeup, shaving, or simply seeking a spa-like retreat, proper lighting makes all the difference. In this guide, we’ll explore 30 bathroom lighting ideas that cater to every style, space, and budget—from elegant vanity sconces to…
There’s something undeniably magical about traditional wedding decor that continues to captivate couples across generations. The timeless elegance of classic elements creates a backdrop for romance that never goes out of style. Whether you’re drawn to the sophistication of formal table settings, the grace of white floral arrangements, or the shimmer of golden accents, traditional…
Missing someone you love creates an ache that video calls alone can’t always fix. Your relationship deserves more than basic check-ins and goodnight texts. The distance between you doesn’t have to mean the distance in your connection. Real intimacy happens when you share experiences together. Physical miles shouldn’t stop you from creating memories, laughing until…
The moment you decide to propose marks the beginning of one of life’s most exciting journeys. Your girlfriend proposal represents more than just asking a question. It becomes a cherished memory that both of you will replay countless times throughout your relationship. This significant milestone deserves thoughtful planning, genuine emotion, and a personal touch that…
Adidas has been revolutionizing the footwear game for decades, creating iconic styles that blend performance, comfort, and fashion-forward design. For women seeking the perfect balance of style and functionality, adidas shoes offer an unmatched combination of athletic heritage and contemporary appeal. Whether you’re hitting the gym, exploring the city, or elevating your everyday style, there’s…
Planning a small backyard wedding offers couples a unique opportunity to create something truly personal. Your own yard transforms into a canvas where memories come to life. Friends and family gather in a space that holds meaning, making the day even more special. Many couples discover that hosting their ceremony at home provides unexpected benefits….