Kitchen Lighting Fixtures: Complete Guide to Brightening Your Space
The right kitchen lighting fixtures transform your cooking space from ordinary to extraordinary. Whether you’re preparing meals, entertaining guests, or enjoying a quiet morning coffee, proper illumination makes every moment better.
Choosing kitchen light fixtures involves more than picking something that looks nice. You need to balance style with function. The fixtures must provide enough light for food prep while creating ambiance for dining.
This guide walks you through everything you need to know about kitchen lighting. From flush mount ceiling lights to stunning pendant fixtures, you’ll discover options that fit your space, budget, and design vision.
Understanding Kitchen Lighting Basics
Every well-lit kitchen uses three types of lighting working together. Ambient light provides overall illumination for the entire room. Task lighting focuses on work areas like countertops and sinks. Accent lighting highlights architectural features or decorative elements.
Ceiling light fixtures typically handle ambient lighting needs. These include flush mounts, semi-flush mounts, and recessed lights. They create a foundation of light throughout the space.
Task lighting requires focused fixtures in specific locations. Pendant lights over islands, under-cabinet strips, and directional track lighting serve this purpose. These fixtures put light exactly where you need it most.
Key Lighting Considerations
Room size determines how many fixtures you need
Ceiling height affects fixture style and placement
The color temperature of bulbs matters significantly. Warm light (2700K-3000K) creates a cozy atmosphere. Cool light (3500K-4100K) provides crisp illumination for detailed tasks. Many homeowners mix both types throughout their kitchen.
Flush Mount Kitchen Lighting Fixtures
Flush mount fixtures attach directly to the ceiling with minimal gap. These light fixtures work perfectly in kitchens with low ceilings or limited vertical space. They provide broad illumination without hanging down into your line of sight.
Modern flush mounts come in countless styles and finishes. Glass shades offer classic appeal and maximum light output. Metal flush mount fixtures create contemporary or industrial looks. Fabric drum shades add softness to the room.
Flush Mount Styles for Every Kitchen
Modern Minimalist
Clean lines and simple shapes define modern flush mounts. Brushed nickel, chrome, and matte black finishes dominate this style. These fixtures blend seamlessly with contemporary kitchen designs.
Traditional Elegance
Clear glass shades with bronze or brass trim bring timeless appeal. These flush mount light fixtures complement classic kitchen cabinets and traditional decor. They often feature detailed metalwork and vintage-inspired elements.
Industrial Character
Exposed bulbs and metal cages create industrial charm. Black iron and aged brass finishes work beautifully. These fixtures add personality while maintaining the low profile of flush mounts.
Semi-flush mount fixtures hang slightly below the ceiling, typically 4-8 inches. This extra space allows for more decorative designs while still working in rooms with standard 8-foot ceilings. The gap creates interesting shadow patterns and visual depth.
Choosing the Right Flush Mount Size
Size matters when selecting flush mount ceiling light fixtures. A fixture that’s too small looks lost on a large ceiling. An oversized light overwhelms a compact kitchen. Use these guidelines for proper sizing.
Kitchen Size
Fixture Diameter
Light Output Needed
Number of Fixtures
Small (up to 100 sq ft)
11-13 inches
3000-4000 lumens
1-2 fixtures
Medium (100-200 sq ft)
13-18 inches
5000-7000 lumens
2-3 fixtures
Large (over 200 sq ft)
18-24 inches
8000-10000 lumens
3-4 fixtures
Kitchen ceiling lights need adequate brightness for safety and functionality. Calculate lumens based on square footage. Multiply your kitchen’s square footage by 50-75 lumens to determine total light output needed.
Explore Flush Mount Kitchen Lighting Options
Discover hundreds of flush mount ceiling light fixtures perfect for your kitchen. From modern designs to traditional styles, find the ideal fixture to brighten your space with both function and beauty.
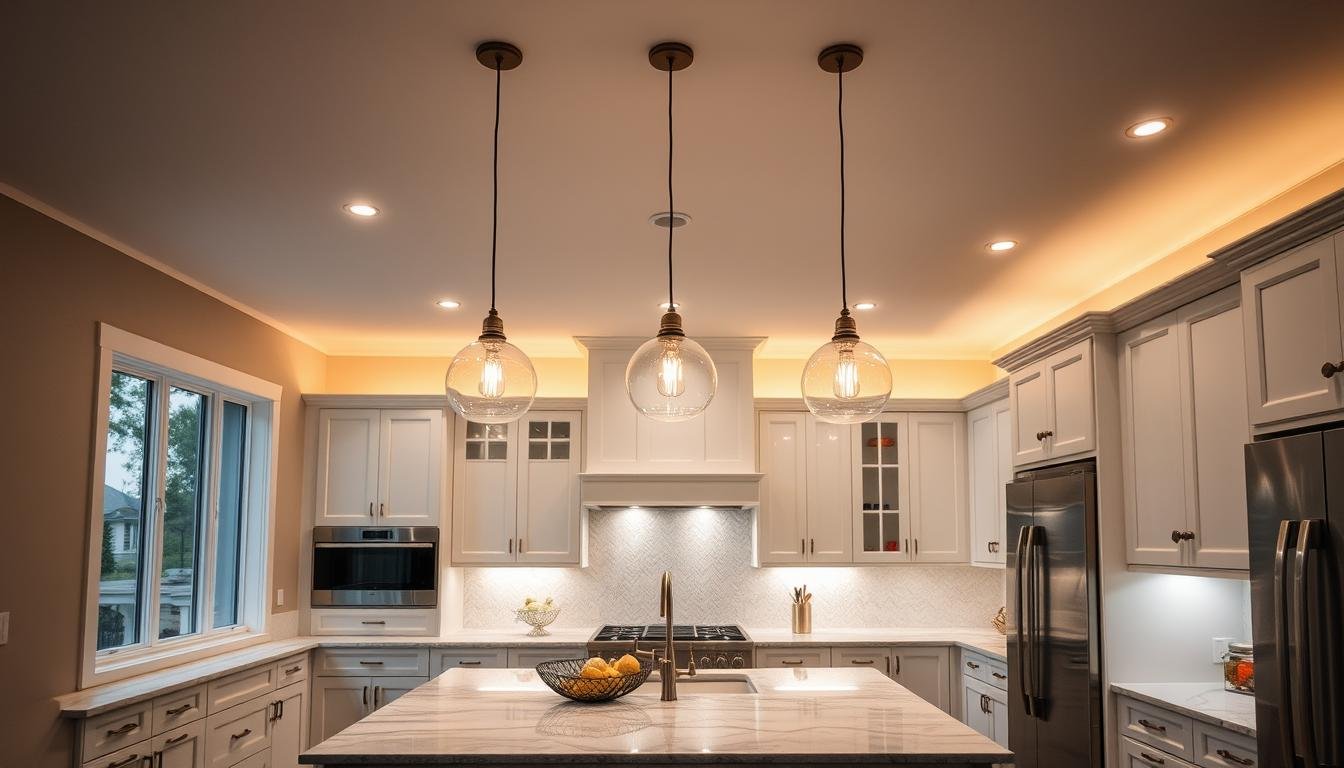
Pendant lights hang from the ceiling on cords, chains, or rods. These fixtures create focal points while providing targeted task lighting. Kitchen islands and dining tables are prime locations for pendant fixtures.
The versatility of pendant lighting is remarkable. Single large pendants make bold statements. Clusters of smaller pendants add visual interest. Linear multi-light pendants span the length of long islands.
Popular Pendant Light Styles
Glass Pendant Designs
Clear glass shades remain incredibly popular for kitchen pendant lights. They showcase beautiful bulbs while maximizing light transmission. The transparent quality keeps sight lines open, making spaces feel larger.
Frosted or seeded glass creates softer illumination. These glass shades diffuse light more evenly across work surfaces. They hide the bulb’s brightness while maintaining a clean, airy aesthetic.
Metal Shade Pendants
Metal shades direct light downward for focused task illumination. Copper, brass, and bronze finishes add warmth to the kitchen. These pendant lights work beautifully in transitional and industrial-style spaces.
The interior finish of metal shades affects light quality. White or gold interiors reflect more light. Dark interiors create dramatic contrast and reduce glare.
Pendant Light Placement Guidelines
Proper spacing and height are crucial for pendant light fixtures. Hang pendants 30-36 inches above countertops for optimal task lighting. This height provides adequate illumination without obstructing views across the island.
Space multiple pendants 24-30 inches apart for balanced light distribution
Center pendants over the island or table they illuminate
Use odd numbers (3 or 5) for visually pleasing arrangements
Match pendant size to island dimensions for proper proportion
Consider sight lines when selecting pendant drop length
Install dimmer switches for adjustable lighting levels
Mini pendant lights work perfectly in smaller kitchens or above narrow islands. Their compact size provides sufficient light without overwhelming the space. Group them together for greater visual impact and better illumination.
Find Your Perfect Pendant Lights
Transform your kitchen island or dining area with stunning pendant lights. Explore thousands of styles from modern glass designs to rustic metal fixtures that combine beauty with brilliant task lighting.
Chandeliers bring elegance and drama to kitchen spaces. These fixtures work beautifully over islands, in dining areas, or as central ceiling lights. Modern kitchen chandeliers range from traditional crystal designs to contemporary geometric shapes.
The scale of chandeliers makes them natural focal points. They create instant visual interest while providing ample light. Choose styles that complement your kitchen’s overall design theme for a cohesive look.
Chandelier Styles for Modern Kitchens
Contemporary Geometric
Angular frames and geometric shapes define modern chandeliers. These fixtures use metal frameworks with exposed bulbs. Black, brass, and mixed metal finishes dominate this category.
The open design allows light to spread freely throughout the room. This creates excellent ambient lighting while maintaining a light, airy feel. Perfect for modern and transitional kitchen styles.
Farmhouse Rustic
Distressed finishes and natural materials create farmhouse charm. Wood elements combined with metal frameworks are common. These chandeliers add warmth and character to kitchen spaces.
Candelabra-style bulbs enhance the rustic appeal. The fixtures often feature wagon wheel designs or mason jar shades. They work wonderfully in country and cottage-style kitchens.
Kitchen ceiling fan fixtures with integrated lighting offer dual functionality. They circulate air while illuminating the space. Modern ceiling fan designs include sleek, barely-visible blades that won’t clash with your decor.
Sizing Chandeliers for Your Kitchen
Chandelier size depends on the space it will occupy. Over an island, the fixture should be roughly one-third to two-thirds the island’s width. For dining areas, measure the table and select a chandelier 12 inches narrower than the table’s width.
Quick Sizing Formula: Add your room’s length and width in feet. Convert that number to inches for the ideal chandelier diameter. For example, a 12×14 foot kitchen (12+14=26) would suit a 26-inch diameter chandelier.
Measure your ceiling height and subtract 8 feet
Multiply the result by 3 inches per foot
Add this number to 20 inches for minimum hanging height
Ensure at least 30 inches clearance above tables or islands
Leave 7 feet minimum clearance from floor to chandelier bottom
LED Kitchen Lighting Technology
LED technology has revolutionized kitchen lighting fixtures. These bulbs use significantly less energy than traditional incandescent or fluorescent options. Most LED kitchen lights last 25,000 to 50,000 hours, reducing replacement frequency.
The quality of LED light has improved dramatically. Early LEDs produced harsh, cold light. Modern LED bulbs offer warm color temperatures identical to incandescent bulbs. You get energy savings without sacrificing ambiance.
Benefits of LED Kitchen Fixtures
Advantages
90% more energy efficient than incandescent bulbs
Extremely long lifespan reduces maintenance needs
Produces minimal heat, keeping kitchens cooler
Available in full range of color temperatures
Instant full brightness with no warm-up time
Dimmable options work with standard dimmer switches
Mercury-free and environmentally friendly
Considerations
Higher upfront cost than traditional bulbs
Some fixtures have non-replaceable integrated LEDs
Quality varies significantly between manufacturers
Certain models may not work with older dimmers
Color rendering can differ from natural light
Integrated LED fixtures have the light source built into the fixture. You cannot replace the bulbs individually. However, these units often last 15-20 years, making replacement unnecessary for most homeowners.
Understanding LED Color Temperature
Color temperature measures the appearance of white light on the Kelvin scale. Lower numbers produce warmer, yellower light. Higher numbers create cooler, bluer illumination.
Kitchen lighting typically uses temperatures between 2700K and 4000K. Warmer temperatures (2700K-3000K) create cozy atmospheres perfect for dining areas. Cooler temperatures (3500K-4000K) provide crisp, energizing light ideal for food preparation.
Many homeowners layer different color temperatures throughout their kitchen. Use warm light in dining and social areas. Install cooler light over work surfaces and sinks. This creates distinct zones while maintaining cohesive design.
Smart LED Kitchen Lighting
Smart LED fixtures connect to home automation systems. Control your kitchen lights through smartphone apps or voice commands. Adjust brightness, color temperature, and create custom lighting scenes.
Schedule lights to turn on before you arrive home
Dim lights automatically for evening ambiance
Change color temperature throughout the day
Create preset scenes for cooking, dining, and entertaining
Monitor energy usage through connected apps
Integrate with other smart home devices
Upgrade to Energy-Efficient LED Lighting
Make the switch to modern LED kitchen fixtures and start saving on energy costs immediately. Browse smart LED options, traditional replacements, and innovative designs that combine efficiency with stunning aesthetics.
The finish of your kitchen light fixtures significantly impacts the overall design. Metal finishes should coordinate with cabinet hardware, faucets, and appliances. Consistency creates a polished, intentional look throughout the space.
Mixing metals has become increasingly popular in kitchen design. Combining finishes adds depth and visual interest. The key is choosing a dominant finish and using others as accents sparingly.
Popular Fixture Finishes
Brushed Nickel
This versatile finish works with virtually any design style. The soft, matte appearance resists fingerprints and water spots. Brushed nickel coordinates beautifully with stainless steel appliances.
Matte Black
Bold and contemporary, matte black creates striking contrast. This finish anchors design schemes and adds sophistication. It pairs exceptionally well with white kitchens or natural wood tones.
Brass and Gold
Warm metallic finishes bring richness to kitchen spaces. Unlacquered brass develops beautiful patina over time. These finishes work wonderfully in traditional, transitional, and eclectic designs.
Matching Fixtures to Kitchen Design Styles
Your kitchen’s overall style should guide fixture selection. Modern kitchens benefit from clean-lined fixtures with minimal ornamentation. Traditional spaces call for more decorative elements and classic shapes.
Kitchen Style
Best Fixture Types
Recommended Finishes
Design Elements
Modern Contemporary
Geometric pendants, minimalist flush mounts, linear lights
Chrome, brushed nickel, matte black
Clean lines, exposed bulbs, metal and glass combinations
Glass shades offer incredible variety in kitchen lighting. Clear glass maximizes light output and showcases beautiful bulbs. Frosted glass softens illumination and hides the light source. Seeded or textured glass adds visual interest while diffusing light.
Indoor Lighting Installation Considerations
Indoor light fixtures require proper installation for safety and performance. Ceiling light fixtures must be securely mounted to electrical boxes rated for their weight. Heavy chandeliers need additional bracing in the ceiling structure.
Install dimmer switches compatible with your bulb type
Consider hiring licensed electricians for complex installations
Follow all local electrical codes and regulations
Test fixtures before completing ceiling repairs
Discover Your Ideal Kitchen Lighting Style
Ready to find fixtures that perfectly complement your kitchen’s design? Explore curated collections spanning every style from sleek modern to charming farmhouse, with finishes that coordinate beautifully with your existing decor.
The best kitchen lighting combines multiple fixture types working together. This layered approach provides flexibility for different activities and times of day. Each lighting layer serves a specific purpose while contributing to the overall illumination.
Ambient lighting forms the foundation. Ceiling light fixtures like flush mounts or recessed lights provide general illumination. This layer allows you to move safely throughout the space and see into cabinets and drawers.
Building Your Lighting Plan
Layer 1: Ambient Lighting
Start with overhead ceiling lights that illuminate the entire room. Recessed fixtures, flush mounts, or semi-flush mounts work well. Space them evenly for uniform light distribution throughout the space.
This foundational layer should provide 50-75 lumens per square foot. Dimmable fixtures allow you to adjust brightness based on time of day and activity. Install switches near all entry points for convenience.
Layer 2: Task Lighting
Add focused light over work areas including countertops, sinks, and stovetops. Under-cabinet LED strips eliminate shadows on prep surfaces. Pendant lights over islands provide both task lighting and style.
Task areas need brighter illumination than ambient zones. Aim for 75-100 lumens per square foot in these locations. Position fixtures to prevent shadows when you’re working at the counter.
Layer 3: Accent Lighting
Highlight architectural features, artwork, or display cabinets with accent fixtures. Small puck lights inside glass cabinets showcase beautiful dishware. LED strips behind floating shelves create drama.
Accent lighting adds depth and visual interest to your kitchen. Use it sparingly to draw attention to specific features. This layer operates independently, turning on only when you want to create ambiance.
Controlling Your Lighting Layers
Separate switches for each lighting layer provide maximum flexibility. Control ambient, task, and accent lighting independently. This allows you to create the perfect lighting for any activity or mood.
Dimmer switches transform how you use your kitchen. Bright light for cooking transitions to soft ambiance for dining. Install dimmers on all lighting circuits for complete control. Ensure dimmers are compatible with your bulb types, especially LEDs.
Install ambient lighting on one switch for general room illumination
Connect island pendant lights to a separate dimmer switch
Wire under-cabinet task lighting independently for food prep control
Put accent lighting on its own switch for optional atmosphere
Consider smart switches for scheduling and remote control
Group multiple switches near main kitchen entrances
Proper Fixture Sizing and Placement
Correct fixture placement is as important as selecting beautiful designs. Poor positioning creates dark spots, shadows, or glare. Understanding placement guidelines ensures your kitchen lighting fixtures perform as well as they look.
Start by identifying your kitchen’s work zones. These include the sink, stove, prep areas, and any dining spaces. Each zone needs appropriate lighting positioned to eliminate shadows and provide adequate brightness.
Recessed Lighting Layout
Recessed ceiling lights create clean, modern ambient lighting. Space fixtures 4-6 feet apart for even light distribution. Position them 12-18 inches from walls to wash vertical surfaces with light and make the room feel larger.
Recessed Light Guidelines
Use 4-inch fixtures for accent lighting in small spaces
Install 5-6 inch fixtures for general ambient lighting
Position fixtures to avoid creating shadows over work areas
Maintain consistent spacing throughout the room
Consider adjustable trim for directional lighting
Account for insulation clearance in ceiling cavities
Island and Peninsula Lighting
Kitchen islands and peninsulas are prime locations for statement pendant lights. The fixtures provide essential task lighting while serving as decorative focal points. Getting the placement right ensures both function and beauty.
Island Lighting Formula
Number of Fixtures: Divide island length by 30 inches. A 6-foot (72-inch) island accommodates 2-3 pendants comfortably.
Fixture Spacing: Measure island length, subtract fixture diameters, divide remaining space by number of gaps. This ensures even distribution.
Hanging Height: 30-36 inches from countertop to fixture bottom provides optimal task lighting without obstructing sight lines.
Table and Dining Area Lighting
Chandeliers or large pendant lights work beautifully over kitchen dining tables. Center the fixture over the table for balanced illumination. The bottom of the fixture should hang 30-34 inches above the table surface.
Round tables pair beautifully with circular or drum-shaped fixtures. Rectangular tables work well with linear pendants or oval chandeliers. The fixture should be roughly 12 inches narrower than the table to maintain proper proportion.
Specialty Fixture Considerations
Beyond standard ceiling and pendant fixtures, specialty lighting enhances both function and aesthetics. These additional light sources solve specific problems while adding layers of sophistication to your kitchen design.
Under-Cabinet Lighting Systems
Under-cabinet lights eliminate shadows on countertops created by overhead fixtures. These task lights make food preparation safer and easier. LED strip lights and puck lights are the most popular options for this application.
LED Strip Lights
Flexible LED strips provide continuous, shadow-free illumination. They install easily with adhesive backing. These fixtures offer the most even light distribution for countertop tasks.
Puck Lights
Small disc-shaped fixtures create focused pools of light. Space them 8-12 inches apart for good coverage. Puck lights work well for highlighting specific work areas or creating accent lighting.
Linear LED Bars
Rigid LED bars offer a middle ground between strips and pucks. They provide directional light with a clean, finished appearance. Multiple bars link together for longer cabinet runs.
Display and Accent Fixtures
Glass-front cabinets benefit from interior lighting that showcases their contents. Small LED fixtures install inside cabinets without generating heat. This accent lighting transforms ordinary storage into beautiful displays.
Toe-kick lighting adds a sophisticated touch while improving safety. LED strips installed beneath base cabinets create a floating effect. This ambient lighting helps navigate the kitchen safely at night without harsh overhead lights.
Ventilation Hood Lighting
Range hoods typically include built-in light fixtures. These lights illuminate the cooktop for safe cooking. Many homeowners overlook this important task lighting component when planning their kitchen lighting.
Modern range hoods feature bright LED lights that consume minimal energy. The fixtures direct light precisely where you need it most. This focused illumination prevents shadows while you cook.
Consider the hood’s lighting when planning your overall kitchen illumination. Powerful hood lights may reduce the need for additional ceiling fixtures over the cooking area. This allows you to focus ambient lighting elsewhere in the room.
Kitchen Lighting Fixtures Buying Guide
Selecting the best kitchen lighting requires balancing aesthetics, functionality, and budget. Understanding what to look for helps you make confident decisions. This guide covers essential factors to consider before purchasing kitchen light fixtures.
Quality Indicators in Light Fixtures
Construction and Materials
High-quality fixtures use durable materials that resist corrosion and wear. Metal components should feel substantial, not flimsy. Glass shades should be thick enough to avoid breaking easily during installation or cleaning.
Check junction boxes and mounting hardware carefully. Quality fixtures include all necessary installation components. The finish should be applied evenly without drips, runs, or thin spots.
Electrical components matter significantly for longevity. Look for UL or ETL certification indicating the fixture meets safety standards. Quality manufacturers provide detailed specifications and warranty information.
Budget Planning for Kitchen Lighting
Kitchen lighting costs vary dramatically based on fixture type, size, and quality. Budget-friendly options start around $30-50 for basic flush mounts. Designer fixtures or large chandeliers can exceed $500-1000 each.
Fixture Type
Budget Range
Mid-Range
Premium
Flush Mount Ceiling Lights
$30 – $75
$75 – $200
$200 – $500+
Pendant Lights (single)
$40 – $100
$100 – $300
$300 – $800+
Kitchen Chandeliers
$100 – $250
$250 – $600
$600 – $2000+
Under-Cabinet LED Systems
$25 – $75
$75 – $200
$200 – $500+
Recessed Lights (per fixture)
$15 – $40
$40 – $100
$100 – $250+
Plan for complete lighting rather than single fixtures. A typical kitchen needs 5-10 recessed lights, 2-3 pendants, and under-cabinet lighting. Total project costs can range from $500 for basic updates to $3000+ for comprehensive renovations.
Energy Efficiency Ratings
Energy Star certified fixtures meet strict efficiency guidelines. These products use LED technology and include features like automatic shutoff. They cost more initially but provide significant long-term savings on electricity bills.
Energy Savings Example: Replacing five 60-watt incandescent bulbs with 10-watt LED equivalents saves approximately $75 annually. Over the LED’s 15-20 year lifespan, that’s $1,125 in energy costs plus reduced replacement expenses.
Return and Warranty Policies
Purchase kitchen lighting fixtures from retailers with flexible return policies. You need to see how fixtures look installed before committing. Some colors and finishes appear different in your space than in photos.
Look for 30-90 day return windows on unused fixtures
Verify warranty coverage for electrical components and finish
Save all packaging until installation is complete
Document any damage or defects immediately upon delivery
Register products when required to activate full warranty protection
Keep receipts and warranty cards in a safe location
Start Your Kitchen Lighting Project Today
You now have the knowledge to select perfect kitchen lighting fixtures for your space. Explore thousands of options across all styles, finishes, and price points. Transform your kitchen with lighting that combines beauty, efficiency, and functionality.
Frequently Asked Questions About Kitchen Lighting Fixtures
How many light fixtures does a kitchen need?
The number depends on your kitchen size and layout. Small kitchens (under 100 square feet) typically need 4-6 recessed lights or 1-2 flush mount fixtures plus task lighting. Medium kitchens (100-200 square feet) require 6-10 ceiling lights, 2-3 pendant fixtures over islands, and under-cabinet lighting. Large kitchens (over 200 square feet) often use 10-15 ambient fixtures, multiple pendants, and comprehensive task lighting throughout.
Calculate based on lumens rather than fixture count. Multiply your square footage by 50-75 lumens for ambient lighting. Add another 75-100 lumens per square foot for task areas. Divide total lumens needed by individual fixture output to determine quantity.
What is the best lighting for kitchen ceiling?
The best kitchen ceiling light depends on ceiling height and room size. Flush mount fixtures work perfectly for standard 8-foot ceilings, providing ample ambient light without hanging down. Semi-flush mounts add style when you have 9-foot ceilings. Recessed LED lights create clean, modern illumination ideal for contemporary kitchens.
For larger kitchens or higher ceilings (10+ feet), consider chandeliers or large pendant fixtures. These create focal points while delivering necessary illumination. Many homeowners combine multiple fixture types – recessed lights for ambient lighting plus pendants or chandeliers for task lighting and visual interest.
Should kitchen lights be warm or cool?
Most kitchen lighting uses warm white (2700K-3000K) or neutral white (3500K-4000K) color temperatures. Warm light creates inviting atmosphere perfect for dining and entertaining areas. Cool light provides crisp, energizing illumination ideal for food preparation tasks.
The best approach layers different color temperatures throughout the space. Use warm light (2700K-3000K) for pendant lights over dining tables and ambient ceiling fixtures. Install cooler light (3500K-4000K) under cabinets and over prep areas where detailed work occurs. This combination balances functionality with comfort.
How do I choose pendant lights for my kitchen island?
Start by measuring your island length. Divide by 30 inches to determine how many pendants fit comfortably. A 6-foot island accommodates 2-3 fixtures. Pendant diameter should be proportional to island size – typically 8-12 inches for standard islands, larger for oversized spaces.
Hang pendants 30-36 inches above the countertop for proper task lighting without obstructing sight lines. Space multiple fixtures evenly, leaving equal gaps between each pendant and from the island ends. Choose styles that complement your kitchen’s overall design while considering shade material for desired light quality.
Are LED kitchen lights worth the extra cost?
LED kitchen lighting fixtures absolutely justify their higher upfront cost through long-term savings. They use 75-90% less energy than incandescent bulbs while lasting 15-25 times longer. A typical kitchen lighting upgrade pays for itself in energy savings within 2-3 years.
Beyond cost savings, LEDs offer superior performance. They produce minimal heat, reducing air conditioning costs in summer. Modern LEDs provide excellent color rendering and are available in all color temperatures. They reach full brightness instantly without warm-up time. Quality LED fixtures often include dimming capability for lighting flexibility.
Can I install kitchen light fixtures myself?
Simple fixture replacements are manageable DIY projects if you have basic electrical knowledge. Swapping an existing flush mount for a new one requires turning off power at the breaker, disconnecting old wires, and connecting the new fixture following manufacturer instructions. Always verify power is off using a voltage tester before touching wires.
More complex installations require professional electricians. This includes adding new fixtures requiring ceiling wiring, installing heavy chandeliers needing structural support, converting switched outlets to hardwired fixtures, or any work involving your home’s electrical panel. Improper electrical work creates serious fire and shock hazards. Local codes may require permitted electrical work be performed by licensed professionals.
Final Thoughts on Kitchen Lighting Fixtures
Selecting the right kitchen lighting fixtures transforms your space functionally and aesthetically. The fixtures you choose affect how you cook, entertain, and enjoy your kitchen daily. Taking time to plan your lighting design pays dividends in comfort, safety, and home value.
Remember that great kitchen lighting combines multiple fixture types working together. Ambient ceiling lights provide overall illumination. Task lighting focuses on work areas. Accent fixtures highlight special features. This layered approach creates flexible lighting for any activity or time of day.
Start by assessing your kitchen’s specific needs. Consider room size, ceiling height, and layout when selecting fixture types. Choose styles and finishes that complement your existing decor. Prioritize LED technology for energy efficiency and longevity. Don’t forget dimmer switches for ultimate lighting control.
Key Takeaways
Layer ambient, task, and accent lighting for best results
Match fixture size to room proportions for proper scale
Choose LED technology for efficiency and long-term savings
Install dimmer switches on all lighting circuits for flexibility
Coordinate fixture finishes with existing kitchen hardware
Plan for both function and aesthetics in every fixture choice
Your kitchen deserves lighting that works as hard as you do. Whether you’re updating a single fixture or planning a complete lighting renovation, the right choices create a space you’ll love for years to come. Quality kitchen lighting fixtures are an investment in your home’s functionality, beauty, and value.
Ready to Upgrade Your Kitchen Lighting?
You have all the information needed to make confident lighting decisions. Explore the complete range of kitchen lighting fixtures and find perfect options that match your style, budget, and functional requirements. Start creating your dream kitchen today.
White Adidas shoes have become an undeniable fashion staple, transcending seasons and trends with their clean aesthetic and versatile appeal. Whether you’re dressing up for a casual outing, hitting the gym, or creating the perfect street style look, these iconic sneakers offer endless styling possibilities. In this guide, we’ll explore the most popular white Adidas…
The timeless appeal of hacienda wedding decor brings together rustic elegance and Old World charm to create a truly magical celebration. Drawing inspiration from the historic estates of Spain and Mexico, a hacienda-themed wedding combines earthy textures, vibrant colors, and natural elements to transport your guests to a place of warmth and romance. This comprehensive…
Your wedding reception is where the celebration truly comes alive. The right decorations transform an ordinary space into a magical setting that reflects your unique love story. Whether you’re dreaming of an elegant ballroom affair, a rustic barn celebration, or an intimate garden gathering, the perfect wedding reception decorations will set the tone for an…
A small balcony can become your favorite spot at home with the right decor approach. That tiny outdoor space—whether in a city apartment or suburban condo—holds incredible potential as a personal sanctuary, dining nook, or green retreat. The key is thoughtful planning and creative solutions that maximize every inch while reflecting your personal style. This…
Receiving an invitation to a country wedding brings both excitement and that familiar wardrobe question: “What should I wear?” Country weddings—whether held in rustic barns, sprawling vineyards, or charming farms—call for a special blend of elegance and practicality. This guide will walk you through everything you need to know about crafting the perfect country wedding…
The moment you decide to ask your girlfriend to marry you marks the beginning of an incredible journey. This proposal will become a story you both tell for the rest of your lives. Your partner deserves a moment that reflects your unique relationship and the love you share together. Planning the perfect proposal idea doesn’t…