LED Strip Lighting Ideas Living Rooms: 30+ Creative Ways
Your living room deserves lighting that creates the perfect atmosphere for every moment. LED strip lights offer an innovative way to transform ordinary spaces into extraordinary environments.
These versatile lighting solutions bring designer-level ambiance to your home without professional installation costs. From subtle accent features to bold statement pieces, LED strips adapt to your unique style.
This guide reveals creative placement ideas and practical techniques. You’ll discover how to use LED strip lighting to enhance your living room’s aesthetic while creating the perfect mood for relaxation or entertainment.
Why LED Strip Lighting Works Perfectly in Living Rooms
LED strips revolutionize home design by offering flexibility that traditional lighting cannot match. These slim, adhesive-backed strips fit into spaces where conventional fixtures simply won’t work.
The energy efficiency of LEDs means you can create stunning visual effects without worrying about electricity bills. Most LED strip lights consume 80% less energy than traditional bulbs while lasting up to 50,000 hours.
Customization stands as another major advantage. You can cut strips to exact lengths, choose from millions of colors, and adjust brightness levels to match any mood or activity in your living space.
Energy Benefits
LED technology delivers significant cost savings over time. The low heat output makes them safe for continuous operation throughout the day and night.
Creative freedom defines LED strip lighting capabilities. You can install them virtually anywhere to achieve the exact aesthetic you envision for your room.
Cuts to custom lengths for precise fitting
Bends around corners and curves easily
Available in various color temperatures
Dimmable options for mood control
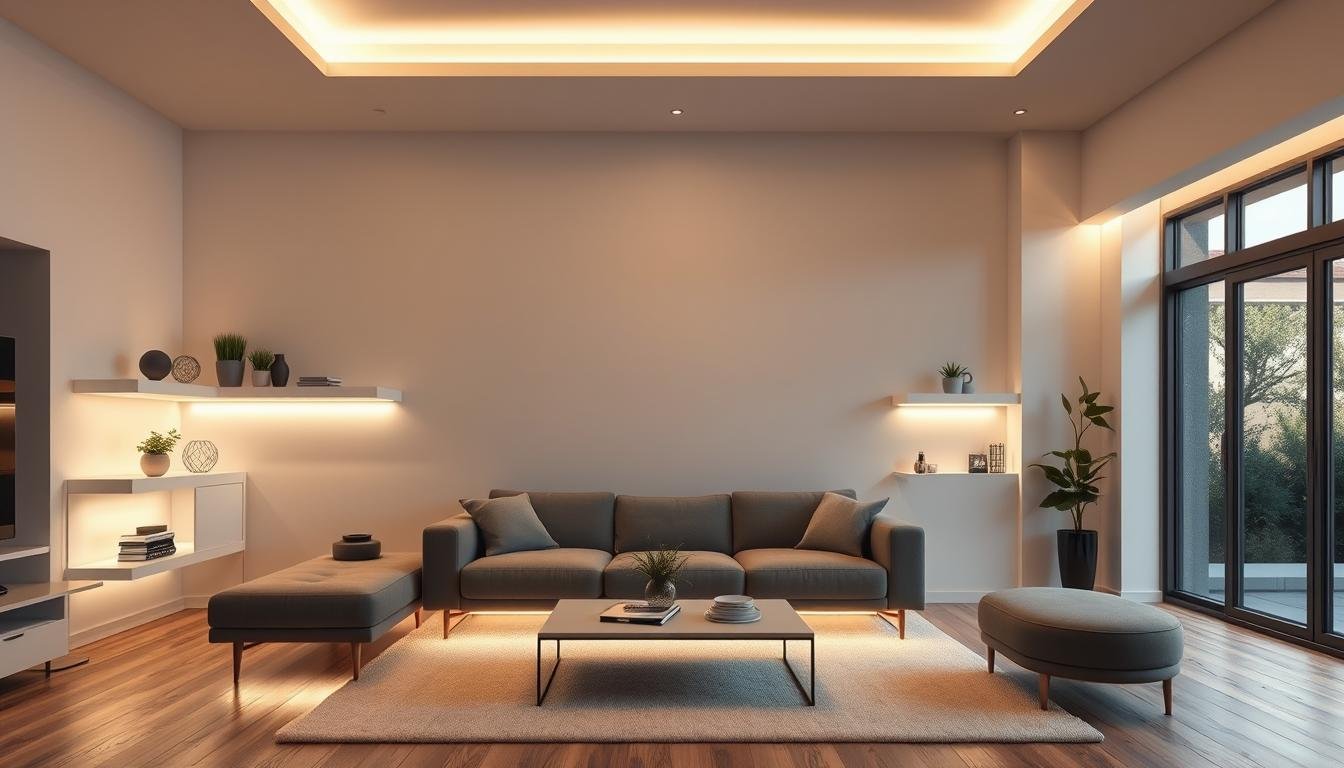
Behind TV and Media Console Installations
Mounting LED strips behind your television creates a stunning floating effect while reducing eye strain during viewing. This placement provides bias lighting that decreases the contrast between your bright screen and dark wall.
The glow emanating from behind your TV adds depth to your entertainment area. It transforms a simple wall-mounted screen into a focal point that commands attention even when turned off.
Installation takes just minutes with adhesive-backed strips. Measure your TV’s perimeter, cut the strip to length, and attach it to the back edges for immediate impact.
Media Console Enhancement Techniques
Extending LED strips under your media console creates a cohesive lighting design. This floating effect makes heavy furniture appear lighter and adds visual interest to lower portions of your room.
Consider using color-changing RGB strips for your media area. You can shift from cool blue during movie nights to warm amber for casual viewing sessions.
Measure console width for accurate strip length
Position strips toward the back edge for optimal glow
Use warm white (2700K-3000K) for cozy evening vibe
Install dimmer switch for brightness control
Coordinate TV backlighting with console lights
Ready to Upgrade Your Entertainment Area?
Explore premium LED strip lights designed specifically for TV and media console installations. Find the perfect length and color temperature for your space.
Crown molding and ceiling coves provide the perfect concealment for LED strips that create indirect ambient lighting. This technique adds architectural interest while illuminating your ceiling with a soft, diffused glow.
The upward-directed light bounces off your ceiling and spreads throughout the room. This creates an even, shadow-free illumination that makes spaces feel larger and more open.
Installation requires mounting strips along the top inner edge of your molding. The light shines upward, hidden from direct view, producing an elegant designer effect.
Creating the Perfect Ceiling Glow
The angle and placement of your strips determine the quality of ceiling illumination. Position them at least two inches from the ceiling surface to allow proper light dispersion.
Choose LED strips with high lumen output for ceiling applications. The light travels further and must overcome more distance than accent lighting positions.
Traditional Molding Approach
Classic crown molding installations work beautifully with LED strips. The existing architecture provides ready-made channels for concealing your lighting.
Position strips 2-3 inches from ceiling
Use cool white (4000K-5000K) for height effect
Install in continuous runs for even glow
Add corner connectors for seamless turns
Modern Recessed Cove Design
Contemporary spaces benefit from purpose-built recessed coves. These architectural features create dedicated spaces for LED strip installations.
Build coves 4-6 inches deep for best results
Paint interior surfaces white for reflection
Include access points for maintenance
Consider tunable white LEDs for flexibility
Perimeter Lighting Patterns
Running LED strips around your entire room perimeter creates a cohesive lighting design. This technique unifies the space and provides consistent ambient illumination from all directions.
Calculate your room’s perimeter and add 10% for corners and connections. Most LED strips come in 16-foot reels, so plan your layout to minimize waste and joints.
Shelving and Cabinet Accent Lighting
Transform ordinary shelves into illuminated display features with strategically placed LED strips. Under-shelf lighting creates a floating effect while highlighting your decorative items and collectibles.
The downward glow from LED strips mounted beneath shelves adds depth and dimension. This technique works especially well with floating shelves, making them appear to hover against your wall.
Bookshelves come alive with internal LED lighting. Install strips along the front edge of each shelf to illuminate book spines and create a library-like atmosphere in your living room.
Floating Shelf Illumination
Position LED strips along the front underside edge of floating shelves for maximum visual impact. This placement ensures the light shines downward while remaining hidden from most viewing angles.
Match your LED color temperature to the shelf material. Warm wood tones pair beautifully with 2700K-3000K LEDs, while white shelves can handle cooler 3500K-4000K temperatures.
Install strips 1 inch from front edge
Use aluminum channels for clean finish
Space shelves 12-18 inches apart for best effect
Connect multiple shelves to single power source
Add individual switches for selective illumination
Display Cabinet Enhancement
Glass-front cabinets become stunning focal points with internal LED strip lighting. The enclosed space amplifies the light effect, creating a jewelry-box quality for displayed items.
Install strips along the top and bottom interior edges of cabinet shelves. This dual-direction lighting eliminates shadows and ensures every item receives proper illumination.
Under Furniture Floating Effects
Installing LED strips beneath furniture creates a magical floating effect that adds contemporary style to your living room. This technique works exceptionally well with sofas, chairs, coffee tables, and sideboards.
The light pooling beneath furniture creates a warm glow that guides movement through your space at night. It serves as subtle pathway lighting without overwhelming brightness.
Recessed mounting ensures the strips remain hidden while producing maximum visual impact. Position them toward the center of the furniture base rather than the outer edge for the best floating effect.
Sofa and Seating Uplighting
Sofas and sectionals benefit tremendously from underside LED installation. The large furniture piece appears lighter and less imposing when surrounded by a subtle glow.
Choose waterproof-rated LED strips for furniture applications. Vacuuming and cleaning activities can expose strips to moisture and debris that standard strips cannot withstand.
Installation Best Practices
Clean furniture base thoroughly before installation
Position strips 2-3 inches from outer edge
Use cable clips to organize wiring neatly
Route power cord behind furniture leg
Test placement before final adhesive application
Design Considerations
Match LED color to flooring tone
Use lower brightness for subtle effect
Consider motion-activated options
Coordinate with other room lighting
Install dimmer for atmosphere control
Sideboard and Console Lighting
Sideboards and console tables gain dramatic presence with under-cabinet LED lighting. The horizontal surface appears to float, creating an illusion of weightlessness despite the substantial furniture piece.
This approach works particularly well for furniture placed against walls. The light reflects off the wall surface and floor, creating a dual-directional glow that enhances depth perception.
Create Professional Floating Effects
Find furniture-grade LED strip lights with the proper mounting accessories and waterproof protection needed for long-lasting installations under sofas and cabinets.
LED strips excel at emphasizing your home’s architectural character. Columns, beams, alcoves, and built-in features become stunning focal points when outlined with carefully placed lighting.
Vertical LED installations draw the eye upward and create a sense of height. This technique particularly benefits rooms with lower ceilings, making spaces feel more expansive and grand.
Textured walls gain new dimension when grazed with LED strip lighting. Position strips close to the wall surface to cast shadows that emphasize texture and create visual interest.
Column and Beam Accentuation
Decorative columns transform into light sculptures with proper LED placement. Install strips in vertical channels or behind the column to create a halo effect that separates the structure from its background.
Exposed beams gain prominence with side-mounted LED strips. The light grazes along the beam surface, highlighting wood grain or architectural details while adding ambient illumination.
Use aluminum channels for straight vertical runs
Position strips to emphasize texture and form
Choose color temperature matching wood tones
Install on multiple sides for dimensional effect
Consider RGB for statement architectural pieces
Alcove and Niche Illumination
Built-in alcoves and wall niches become gallery-quality display spaces with proper LED lighting. Install strips around the perimeter or along the top edge to wash light across displayed artwork or objects.
The three-dimensional quality of recessed spaces benefits from layered lighting. Combine perimeter strips with focused accent lighting for professional museum-style illumination.
Window Treatment and Valance Lighting
Window valances provide perfect concealment for LED strips that create a sophisticated window glow. The light emanates from behind curtains, adding depth and visual interest to your window treatments.
This placement creates beautiful ambiance during evening hours while remaining completely invisible during the day. The LED strips hide within the valance structure, revealing themselves only when illuminated.
Installation involves mounting strips along the top interior edge of your valance box. The light shines downward behind your curtains, creating a soft backlight effect that enhances your window area.
Curtain Backlighting Techniques
Sheer curtains create stunning diffusion effects when backlit with LED strips. The translucent fabric spreads the light evenly while creating a warm, inviting glow throughout your living space.
Heavier drapes benefit from higher-output LED strips to penetrate the fabric thickness. Position strips closer to the curtain fabric for more intense backlighting effects.
Measure valance interior length accurately
Use warm white LEDs for cozy evening effect
Install dimmer for adjustable intensity
Position strips 1-2 inches from curtain fabric
Include timer for automatic evening activation
Coordinate with other room lighting zones
Staircase and Step Lighting Solutions
Living rooms with staircases gain both safety and style through LED step lighting. Installing strips beneath each stair tread creates a continuous line of light that guides movement while adding sophisticated design elements.
The low-level illumination proves particularly valuable during nighttime navigation. Family members can safely use stairs without activating bright overhead lights that disrupt the room’s ambiance.
Recessed aluminum channels provide the most professional installation method. These channels mount flush with the stair surface and protect LED strips while creating a clean, finished appearance.
Step Nose Installation Method
The step nose represents the optimal location for staircase LED strips. This position illuminates the tread below while remaining protected from foot traffic by the overhang.
Motion-activated systems add convenience and energy savings. The lights activate automatically when someone approaches the stairs and turn off after a preset duration.
Safety Benefits
Clearly defines each step edge
Provides night-time navigation lighting
Reduces accident risk in darkness
Low-level illumination preserves night vision
Design Advantages
Creates floating step visual effect
Adds architectural interest to plain stairs
Complements modern interior design
Customizable color and brightness levels
Color Temperature and Mood Settings
Color temperature dramatically affects your living room’s mood and atmosphere. Warm white LEDs (2700K-3000K) create cozy, intimate environments perfect for evening relaxation and conversation.
Cool white options (5000K-6500K) energize spaces and work well for task-oriented activities. These higher temperatures mimic daylight and enhance focus during daytime hours.
Tunable white LED strips offer ultimate flexibility. These systems allow you to adjust color temperature throughout the day, matching your circadian rhythm and activity needs.
RGB and Color-Changing Options
RGB LED strips unlock creative possibilities beyond white light. Change your room’s entire atmosphere instantly with colors ranging from subtle pastels to vibrant saturated hues.
Smart RGB systems integrate with voice assistants and smartphone apps. Program custom scenes, set schedules, and sync lighting with music or television content for immersive experiences.
Warm white (2700K-3000K) for relaxation and dining
Neutral white (3500K-4000K) for general activities
Cool white (5000K-6500K) for task lighting needs
RGB color options for parties and special events
Tunable white for all-day adaptability
Smart controls for convenient adjustment
Creating Layered Lighting Scenes
Combine multiple LED strip installations at different color temperatures to create sophisticated layered lighting. Use warm white for furniture floating effects while employing cool white for ceiling coves.
Zone control allows independent adjustment of different LED strip areas. Install separate dimmers or smart controllers for each zone to craft the perfect lighting scene for any occasion.
Discover Smart LED Strip Solutions
Explore advanced LED strip lights with tunable white technology and RGB color-changing capabilities. Find smart-home compatible options with app control and voice activation.
Successful LED strip installation begins with proper surface preparation. Clean all mounting surfaces thoroughly with isopropyl alcohol to ensure strong adhesive bonding that lasts for years.
Measure twice and cut once applies perfectly to LED strip projects. Most strips feature designated cutting points every few inches, allowing precise length customization without damaging the electrical circuits.
Power supply selection proves critical for reliable operation. Calculate total wattage by multiplying strip length by watts-per-foot specification, then add 20% capacity margin for safety and longevity.
Planning Your Layout
Create a detailed layout plan before purchasing materials. Map every LED strip run, power connection point, and controller location to avoid surprises during installation.
Account for corners and turns in your design. LED strips bend easily along their length but require special corner connectors or careful cutting and soldering for 90-degree turns.
Essential Tools
Measuring tape and marking pencil
Scissors or wire cutters for cutting strips
Isopropyl alcohol for surface cleaning
Cable clips for wire management
Voltage tester for electrical safety
Common Mistakes to Avoid
Skipping surface preparation steps
Cutting strips between designated points
Undersizing power supply capacity
Installing strips in high-moisture areas
Exceeding maximum run length specifications
Wiring and Power Connections
Low-voltage DC power makes LED strips safe and simple to install. Most systems operate on 12V or 24V, eliminating shock hazards associated with standard household electrical work.
Parallel wiring ensures consistent brightness across long runs. Connect power to both ends of extended LED strips to prevent voltage drop that causes dimming at the far end.
Match power supply voltage to LED strip requirements
Calculate total amperage for all connected strips
Use proper gauge wire for power distances
Install inline fuses for overcurrent protection
Hide power supplies in accessible locations
Label all connections for future maintenance
Maintenance and Longevity
LED strip lights require minimal maintenance when properly installed. Dust accumulation represents the primary concern, potentially reducing light output and creating fire hazards over time.
Gentle cleaning with a soft, dry cloth every few months keeps strips performing optimally. For strips in aluminum channels, remove the diffuser cover for thorough cleaning access.
Quality LED strips typically last 30,000 to 50,000 hours under normal conditions. At three hours daily usage, this translates to 27-45 years of reliable illumination for your living room.
Troubleshooting Common Issues
Flickering lights often indicate loose connections or inadequate power supply. Check all connection points and verify your power adapter meets the system’s total wattage requirements.
Color inconsistencies in RGB strips usually stem from controller issues or damaged LED segments. Reset the controller first, then inspect strips for physical damage.
LED Strip Advantages
Exceptional energy efficiency saves money
Extremely long lifespan reduces replacements
Low heat output ensures safety
Flexible installation in tight spaces
Dimmable for perfect ambiance control
Available in countless colors and temperatures
Potential Drawbacks
Initial cost higher than traditional bulbs
Adhesive may fail on textured surfaces
Color quality varies between brands
Some installations require electrical knowledge
Dimming compatibility issues can occur
When to Replace LED Strips
LED strips rarely fail completely but may experience gradual lumen depreciation over time. When brightness decreases noticeably or color rendering changes, replacement becomes worthwhile.
Individual LED failures create dark spots along the strip. While strips continue functioning, these gaps become increasingly visible and detract from the overall aesthetic effect.
Budget Planning and Cost Considerations
LED strip lighting projects accommodate virtually any budget level. Basic installations start around fifty dollars for a single room accent, while comprehensive whole-room designs can reach several hundred dollars.
Quality proves more important than quantity when selecting LED strips. Premium strips with higher LED density and better color rendering create superior results that justify their moderate price premium.
Factor installation accessories into your budget planning. Power supplies, controllers, aluminum channels, and mounting hardware add up quickly but ensure professional-quality results.
Cost Breakdown by Project Type
Basic Accent Project
Single installation point with standard LED strips and basic controls.
16 feet of LED strips
Power supply included
Manual dimmer switch
Adhesive mounting only
Estimated Cost: $50-$100
Mid-Range Enhancement
Multiple zones with quality strips and smart controls for versatile lighting.
50 feet total LED strips
WiFi-enabled controller
Aluminum channels for key areas
Professional power distribution
Estimated Cost: $200-$400
Premium Full Design
Comprehensive room lighting with high-end components and professional installation quality.
100+ feet premium LED strips
Smart home integration
Complete aluminum channel system
Multiple zones with scene control
Estimated Cost: $500-$1000+
Long-Term Value Analysis
Energy savings offset initial LED strip investment over time. Compared to equivalent incandescent or halogen lighting, LEDs reduce electricity consumption by 80% while lasting ten times longer.
The elimination of bulb replacement costs adds value beyond energy savings. LED strips typically outlast the furniture and decor around them, requiring no maintenance expenses for decades.
Start Your LED Strip Project Today
Find everything you need for professional LED strip installations at any budget level. Compare options, read reviews, and choose the perfect components for your living room transformation.
Safety begins with selecting certified LED strips from reputable manufacturers. Look for UL, ETL, or CE certification marks that indicate products meet established electrical safety standards.
Never exceed the maximum run length specified by manufacturers. Overloading LED strips causes excessive heat buildup that degrades components and creates potential fire hazards.
Proper ventilation ensures long-term reliability. Avoid installing LED strips in completely enclosed spaces without airflow, especially high-output strips that generate more heat.
Electrical Safety Guidelines
Low-voltage LED strips dramatically reduce electrical shock risks compared to line-voltage fixtures. The 12V or 24V DC power presents minimal danger even with exposed connections.
However, power supplies convert standard 120V AC household current to low-voltage DC. These adapters require proper installation in accessible locations with adequate cooling space.
Purchase only certified LED strips and power supplies
Quality LED strips generate minimal heat under normal operation. However, improper installation or electrical faults can create dangerous conditions that require preventive measures.
Install LED strips on non-combustible surfaces whenever possible. Avoid direct contact with flammable materials like fabric, paper, or certain plastics that could ignite under fault conditions.
Bringing Your Living Room Vision to Life
LED strip lighting transforms ordinary living rooms into extraordinary spaces that reflect your personal style. The creative possibilities extend far beyond basic illumination into the realm of artistic expression.
Start with one accent application to experience the dramatic impact LED strips deliver. Behind your television or beneath a sofa provides an excellent introduction to this versatile lighting tool.
Expand your design gradually as confidence grows. Each new LED strip installation builds upon previous successes, creating layers of light that add depth, dimension, and atmosphere to your living space.
The investment in quality LED strip lighting pays dividends through years of reliable performance. Energy savings, longevity, and the sheer joy of beautiful ambient lighting make this upgrade one of the most rewarding home improvement projects you can undertake.
Your living room awaits transformation into the inviting, stylish space you’ve always envisioned. With LED strip lights and creative placement ideas, that vision becomes an illuminated reality.
Even the tiniest balcony can become your favorite spot at home with the right approach. Your small balcony isn’t just an architectural afterthought—it’s an opportunity to create a personal retreat that reflects your style and meets your needs. Whether you dream of a cozy reading nook, a mini garden oasis, or an intimate dining space,…
Creating beautiful memories with your partner starts with the perfect photo. Photo booth poses offer couples a unique way to capture their love story in fun and creative ways. Whether you’re celebrating a wedding, anniversary, or simply want to freeze a special moment in time, the right pose makes all the difference. These ideas will…
A tiny balcony might seem like a limited space, but with thoughtful planning and creative design, it can become your favorite spot at home. Whether you dream of a cozy reading nook, a mini garden retreat, or a stylish entertainment area, your small balcony holds enormous potential. This guide will walk you through transforming even…
Celebrating fifty years of marriage stands as one of life’s most remarkable milestones. When a couple reaches their 50th wedding anniversary, they deserve a celebration that honors their enduring love and commitment. This golden anniversary represents decades of shared memories, challenges overcome together, and a lifetime of devotion. Planning the perfect party requires thoughtful consideration…
Your 16th birthday marks a special milestone in life. It’s a moment worth capturing through beautiful photos that you’ll treasure for years to come. A sweet photoshoot transforms this important event into lasting memories that celebrate who you are becoming. Planning the perfect sweet 16 photo shoot can feel overwhelming. You want pictures that reflect…
The timeless appeal of hacienda wedding decor brings together rustic elegance and Old World charm to create a truly magical celebration. Drawing inspiration from the historic estates of Spain and Mexico, a hacienda-themed wedding combines earthy textures, vibrant colors, and natural elements to transport your guests to a place of warmth and romance. This comprehensive…