LED Strip Lighting Ideas Bedroom: 35+ Creative Designs
Your bedroom deserves lighting that adapts to your mood. LED strips offer endless possibilities for creating the perfect atmosphere.
These versatile lighting solutions transform ordinary bedrooms into personalized retreats. Whether you want relaxing warm tones for winding down or vibrant RGB colors for entertainment, LED strip lights deliver.
The beauty of using LED strips lies in their flexibility. You can install them virtually anywhere to highlight architectural features, create ambient lighting, or add functional illumination.
Why LED Strip Lights Work Perfectly in Bedrooms
LED technology has revolutionized bedroom lighting. These strips consume minimal power while producing impressive brightness levels.
Energy Efficiency Benefits
LED strips use 75% less energy than traditional lighting. Your electricity bills decrease while your lighting quality improves dramatically.
Most LED strips last 50,000 hours or more. This longevity means years of maintenance-free operation in your bedroom.
Installation Simplicity
Most LED strips feature adhesive backing for quick installation. No electrical expertise required for basic setups.
You can cut strips to exact lengths and connect them around corners. This flexibility allows custom fitting for any bedroom layout.
The versatility of LED strip lighting extends beyond basic illumination. Modern strips offer color-changing capabilities, dimming functions, and smart home integration.
Headboard LED Strip Lighting Ideas
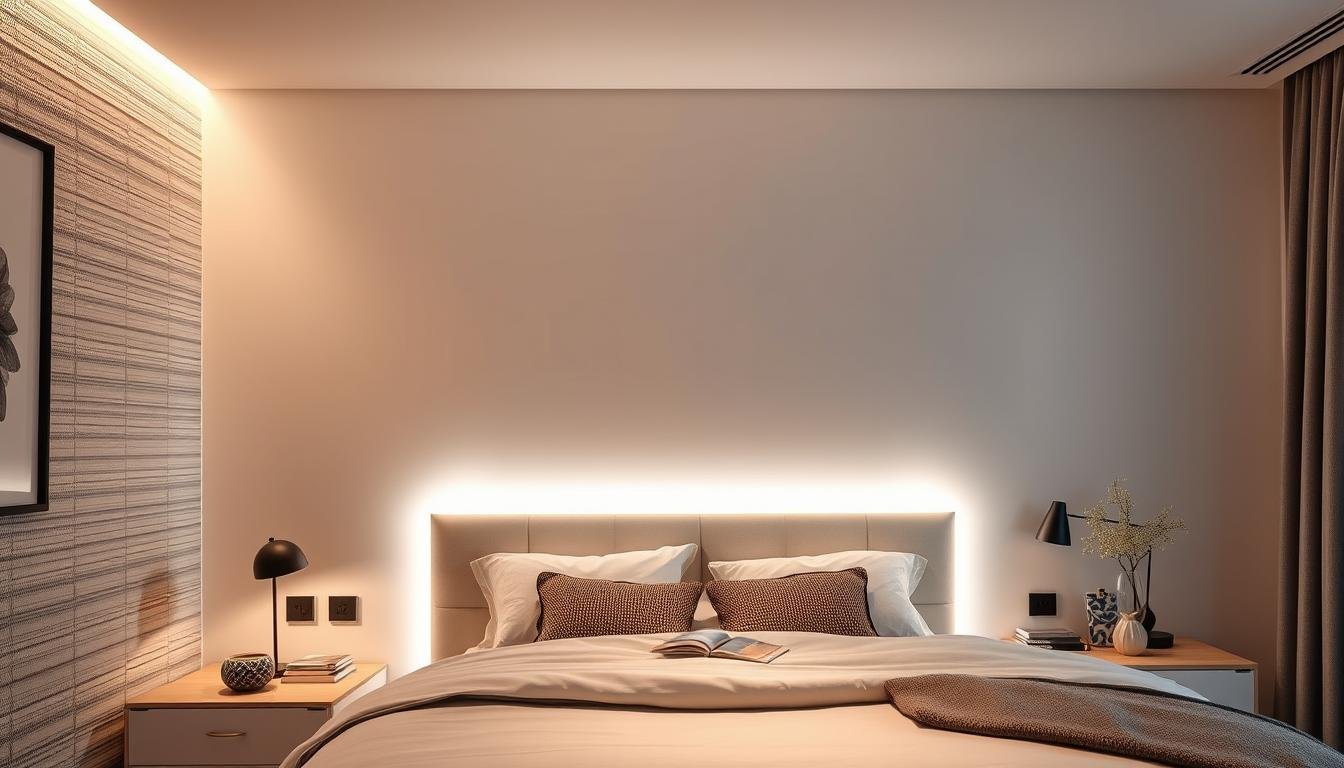
Positioning LED strips behind your headboard creates an elegant floating effect. This technique adds depth to your bedroom walls while providing soft ambient lighting.
Floating Headboard Glow
Install LED strips along the back edge of your headboard. The light reflects off the wall, creating a subtle halo effect.
Warm white LEDs work best for this application. They create a cozy atmosphere perfect for bedtime reading.
Built-in Headboard Channels
Some headboards feature recessed channels designed specifically for LED strips. These create clean, professional-looking installations.
The strips remain hidden while the light shines through frosted panels. This approach delivers even illumination across the entire headboard.
Color-Changing Headboard Accent
RGB LED strips behind headboards offer dynamic mood lighting. Switch between colors to match your preferences or activities.
Cool white works for morning routines. Warm tones help you wind down at night. Purple or blue creates a relaxing spa-like environment.
The key to successful headboard lighting involves proper strip placement. Position strips 2-3 inches from the wall for optimal light diffusion.
Ready to Transform Your Headboard?
Explore warm white LED strips perfect for creating that elegant floating headboard effect in your bedroom.
Installing LED strips under your bed frame creates a floating illusion. This practical lighting solution also serves as gentle nighttime navigation.
Under-bed lighting serves multiple purposes beyond aesthetics. It provides enough illumination for safe nighttime movement without disrupting your sleep patterns.
Platform Bed Installation
Platform beds offer ideal conditions for LED strip installation. Attach strips along the underside perimeter of the bed frame.
The elevation creates perfect spacing for light to spread across the floor. Motion sensors can automate this lighting for hands-free operation.
Bed Frame Channels
Some modern bed frames include dedicated channels for LED strips. These pre-designed spaces simplify installation and cable management.
Strips along the bed frame create consistent lighting around the entire perimeter. This produces a professional-grade floating effect.
Choose warm white (2700-3000K) for relaxing nighttime ambiance
Install motion sensors for automatic activation during night
Position strips along all four sides for balanced lighting
Use waterproof strips if bedroom has high humidity
Connect to dimmer for adjustable brightness levels
Ensure proper power supply placement near outlet
The under-bed lighting effect works particularly well with raised bed frames. Standard bed heights of 18-24 inches provide optimal light dispersion.
Ceiling Cove and Tray LED Strip Lighting
Ceiling installations create dramatic overhead lighting effects. LED strips hidden in coves or trays deliver sophisticated ambient illumination.
Cove Lighting Design
Install strips along ceiling coves where walls meet the ceiling. The light reflects upward, creating soft indirect illumination throughout the room.
This technique eliminates harsh shadows while adding architectural interest. Cove lighting makes standard ceilings appear taller and more elegant.
Tray Ceiling Enhancement
Tray ceilings benefit tremendously from LED strip installation. Place strips around the tray perimeter to highlight this architectural feature.
The recessed area conceals the strips while showcasing the light. Different colors can emphasize the tray’s depth and dimension.
Crown Molding Integration
Installing LED strips behind crown molding creates elegant indirect lighting. The molding hides the strips while directing light upward.
This classic approach works in traditional and contemporary bedrooms. It adds luxury without requiring ceiling modifications.
Ceiling LED installations require careful planning. Calculate the required strip length by measuring your ceiling perimeter plus 10% for connections.
Installation Tip: Use aluminum channels for ceiling strips. They provide heat dissipation, protect the strips, and create cleaner lines along your ceiling edges.
Closet and Wardrobe LED Strip Solutions
Proper closet lighting transforms your morning routine. LED strips provide bright, even illumination for clothing selection and organization.
Closet LED strips solve common wardrobe lighting problems. They eliminate shadows, accurately render colors, and help you find items quickly.
Rod-Mounted Strips
Attach LED strips directly to clothing rods. This placement illuminates hanging garments from above, making selection effortless.
Cool white LEDs (5000-6500K) provide accurate color rendering. You can better match clothing items under this neutral light.
Shelf Edge Lighting
Install strips along the front edge of closet shelves. Each shelf receives dedicated lighting that eliminates dark corners.
This installation method showcases folded clothing, accessories, and shoes. The light creates a boutique-style shopping experience in your own closet.
Upgrade Your Closet Lighting
Discover RGB and color-changing LED strips that adapt to your mood and bring vibrant atmosphere to your bedroom spaces.
LED strips around bedroom mirrors create professional-quality lighting for grooming and makeup application. This setup eliminates unflattering shadows on your face.
The placement of LED strips around mirrors significantly impacts functionality. Position strips on all four sides for the most even, shadow-free illumination.
Full Frame Mirror Lighting
Border your entire mirror with LED strips. This creates even illumination from all angles, similar to professional makeup studios.
Use neutral white (4000-4500K) for accurate color representation. This color temperature shows makeup and clothing in true-to-life conditions.
Backlit Mirror Effect
Install strips behind mirrors mounted slightly away from walls. The light creates an elegant halo effect around the mirror perimeter.
This approach combines functional lighting with decorative ambiance. Dimmable strips allow adjustment based on time of day.
Vanity Drawer Lighting
Add LED strips inside vanity drawers for organized storage visibility. Motion-activated strips illuminate contents when drawers open.
This practical solution helps locate small items like jewelry and cosmetics. Battery-powered strips work well for drawer applications.
Accent Wall LED Strip Designs
LED strips transform accent walls into stunning focal points. Creative installation patterns create unique lighting art in your bedroom.
Accent wall lighting adds personality to bedroom spaces. The strips create visual interest while providing adjustable mood lighting for different activities.
Geometric Pattern Installations
Create geometric shapes using LED strips on accent walls. Triangles, hexagons, and linear patterns add modern artistic flair.
Plan your pattern carefully before installation. Use painter’s tape to outline designs and ensure straight lines.
Vertical Line Designs
Install vertical LED strip lines at regular intervals across your accent wall. This pattern creates a contemporary, gallery-like atmosphere.
Spacing vertical strips 12-18 inches apart provides balanced coverage. Different colors on alternating strips create dynamic effects.
Accent wall installations allow creative expression. Mix warm and cool tones or incorporate RGB strips for color-changing capabilities.
Window Frame and Curtain LED Lighting
Outlining windows with LED strips creates magical effects. This technique frames your windows while adding ambient light to bedroom spaces.
Window Frame Outline
Install LED strips around window frames to create an illuminated border. This highlights windows as architectural features.
The effect works beautifully at night when curtains are drawn. Soft lighting creates a cozy, enclosed feeling.
Behind Sheer Curtain Placement
Place LED strips behind sheer curtains for diffused lighting effects. The fabric softens the light and distributes it evenly.
This creates a glowing curtain effect visible from both inside and outside. Color-changing strips offer versatile ambiance options.
Valance Hidden Lighting
Conceal LED strips within window valances for subtle downward illumination. The light flows over curtains and window treatments.
This technique provides functional lighting while maintaining clean aesthetics. No visible wiring or light sources interrupt your décor.
Furniture-Integrated LED Strip Ideas
Built-in LED strips elevate standard bedroom furniture into custom pieces. Strategic placement creates both functional and decorative lighting.
Furniture lighting serves dual purposes. It highlights décor items while providing subtle room illumination.
Floating Shelf Illumination
Install LED strips under floating shelves to create a levitating effect. Light cascades down the wall below each shelf.
This installation showcases books, photos, and decorative objects. The underlighting adds depth and dimension to your bedroom walls.
Nightstand Drawer Lighting
Add LED strips inside nightstand drawers for convenient visibility. Battery-powered strips with motion sensors work perfectly.
Finding items becomes effortless without turning on bright overhead lights. This preserves your night vision and bedroom ambiance.
Essential LED Installation Accessories
Get the connectors, controllers, and power supplies needed for professional LED strip installations in your bedroom.
Smart LED strips bring bedroom lighting into the connected home era. Voice control, scheduling, and scene creation enhance your lighting experience.
Smart capabilities transform basic LED strips into dynamic lighting systems. Integration with home assistants enables hands-free operation.
Voice Control Setup
Connect LED strips to Alexa, Google Assistant, or Siri for voice commands. Adjust brightness, colors, and power without touching switches.
Voice control proves especially useful during bedtime routines. Simply speak commands to dim lights or change colors.
Automated Schedules
Program LED strips to follow daily schedules. Wake up to gradually brightening warm white light that simulates sunrise.
Automatic dimming in evening helps signal bedtime. Lights can turn off completely at designated sleep times.
Scene Creation
Save custom lighting scenes for different activities. Create reading scenes, relaxation modes, or party atmospheres with single taps.
Each scene adjusts color, brightness, and which strips activate. Switch between moods instantly to match your needs.
Smart LED strips typically require Wi-Fi connectivity and compatible apps. Most systems work with standard home networks without additional hubs.
Color Temperature and Mood Lighting Guide
Understanding color temperature helps you select appropriate LED strips for your bedroom. Different temperatures create distinct moods and serve varied purposes.
Color Temperature
Kelvin Range
Best Bedroom Use
Mood Effect
Warm White
2700-3000K
Headboards, under-bed, ambient lighting
Relaxing, cozy, sleep-promoting
Soft White
3000-3500K
General lighting, reading areas
Comfortable, welcoming, balanced
Neutral White
3500-4500K
Closets, vanities, task lighting
Natural, accurate color rendering
Cool White
5000-6500K
Makeup areas, detailed work zones
Alert, energizing, focused
RGB Color-Changing
Variable
Accent walls, entertainment areas
Dynamic, customizable, mood-adaptive
Most bedrooms benefit from warm white LED strips. These temperatures promote relaxation and prepare your body for sleep.
Sleep Science Insight: Exposure to cool white or blue light in the evening can suppress melatonin production. Choose warm white (2700-3000K) for bedroom LED strips used within 2-3 hours of bedtime.
LED Strip Installation Step-by-Step Guide
Installing LED strips requires minimal tools and basic electrical knowledge. Following proper procedures ensures safe, long-lasting results.
Required Tools and Materials
LED strip lights (appropriate length for your project)
Power supply (matching voltage and wattage requirements)
Scissors or cutting tool (for trimming strips at designated marks)
Isopropyl alcohol and cloth (for surface cleaning)
Connectors or soldering kit (for joining strip sections)
Mounting clips or aluminum channels (optional, for professional finish)
Dimmer or controller (for brightness and color adjustment)
Pre-Installation Checklist
Measure installation area precisely before purchasing strips
Calculate total power consumption to select appropriate supply
Identify nearby power outlets for convenient connection
Clean and dry all mounting surfaces thoroughly
Test LED strips before permanent installation
Plan cable routing to hide wires effectively
Installation Process
Clean the mounting surface with isopropyl alcohol to remove dust, oil, and debris. Allow surface to dry completely before proceeding.
Measure and mark the exact placement of your LED strips. Use a level to ensure straight lines for professional-looking installations.
Cut LED strips only at designated cutting marks. These appear every few LEDs and show scissor icons or copper pads.
Remove backing paper from adhesive side of LED strips. Work in small sections to prevent premature sticking during positioning.
Press LED strips firmly along marked lines. Apply consistent pressure across the entire length to ensure proper adhesion.
Connect strip sections using appropriate connectors or soldering. Follow manufacturer specifications for proper electrical connections.
Attach power supply to LED strips following polarity markings. Red connects to positive, black to negative terminals.
Test the installation before final mounting. Verify all sections illuminate correctly and connections remain secure.
Secure loose cables using clips or channels. Route power cables behind furniture or along baseboards for clean appearance.
Install dimmer or controller according to manufacturer instructions. Program smart features if using connected LED systems.
Safety Note: Always disconnect power before making electrical connections. Use only power supplies rated for your specific LED strip voltage and wattage. Overloading can cause fire hazards or damage to your LED strips.
LED Strip Power Supply and Wattage Calculations
Selecting the correct power supply prevents LED strip failures and ensures optimal performance. Calculations based on strip length and density determine requirements.
Basic Power Calculation Formula
Multiply the wattage per meter by your total strip length. Add 20% buffer for power supply longevity.
Example: 5 meters of strip × 12 watts per meter = 60 watts. Add 20% buffer: 60 × 1.2 = 72 watts minimum power supply.
Voltage Considerations
LED strips commonly operate at 12V or 24V. Higher voltage strips allow longer runs without voltage drop issues.
For runs exceeding 16 feet, consider 24V strips. They maintain consistent brightness across the entire length.
Check LED strip specifications for watts per meter rating
Measure total installation length including all sections
Calculate total wattage using length × watts per meter
Add 20% safety margin to calculated wattage
Select power supply matching or exceeding this wattage
Verify voltage matches LED strip requirements exactly
Consider multiple power supplies for very long runs
Use constant voltage drivers for consistent performance
Find Smart LED Controllers
Explore smart controllers and dimmers that bring automation, voice control, and scene programming to your bedroom LED strips.
Combining multiple LED strip installations creates layered lighting effects. Strategic placement in different bedroom zones produces professional designer results.
Layered lighting adds dimension and flexibility to bedroom spaces. Different strips serve distinct functions while creating cohesive visual harmony.
Ambient + Task Lighting
Combine warm white ceiling cove strips for ambient light with cool white vanity strips for task illumination.
This pairing provides overall room glow while ensuring adequate brightness for detailed activities like makeup application or reading.
Multi-Zone Color Control
Install separate RGB strips in different bedroom zones with independent controls. Customize each area for specific activities.
Headboard area might display relaxing blue while accent wall shows energizing orange. Each zone adapts to your current needs.
Synchronized Lighting Scenes
Program all bedroom LED strips to work together in coordinated scenes. Morning scene activates cool white closet lights while keeping bed area dim.
Evening scene reverses this, brightening relaxation areas while functional spaces dim. Smart controllers make scene switching effortless.
Specialty LED Strip Applications for Bedrooms
Beyond standard installations, creative LED strip applications solve unique bedroom challenges and create distinctive features.
Art and Photo Illumination
Install LED strips above framed artwork or photo galleries. Directed downward lighting highlights wall décor professionally.
Adjustable color temperature lets you match lighting to artwork characteristics. Warm tones complement traditional pieces while neutral white suits photography.
Reading Nook Lighting
Create dedicated reading spaces with focused LED strip placement. Mount strips along shelving or behind reading chairs for targeted illumination.
Bright white (4000K) provides optimal reading conditions without eye strain. Dimmers allow adjustment based on ambient light levels.
Plant Display Lighting
Showcase indoor plants with dedicated LED strip lighting. Full-spectrum strips can even support plant growth while adding living décor.
Position strips to highlight plant textures and colors. The effect creates a natural, calming environment in your bedroom.
Architectural Feature Highlighting
Emphasize existing architectural elements like alcoves, niches, or exposed beams. LED strips draw attention to these unique bedroom characteristics.
Color-changing strips let you alter the emphasis based on mood or season. Transform your bedroom’s appearance without physical changes.
LED Strip Recommendations by Bedroom Size
Bedroom dimensions influence LED strip quantity and placement strategies. Proper scaling ensures balanced illumination without overwhelming or underwhelming your space.
Bedroom Size
Dimensions
Recommended Strip Length
Ideal Placement Zones
Brightness Level
Small
10′ × 10′
16-25 feet
Headboard, under bed
300-500 lumens total
Medium
12′ × 14′
30-45 feet
Headboard, ceiling cove, closet
600-900 lumens total
Large
15′ × 18′
50-70 feet
Multiple zones, accent walls, furniture
1000-1500 lumens total
Master Suite
18′ × 20’+
75-100+ feet
Full layered lighting system
1500-2500 lumens total
These recommendations serve as starting points. Personal preferences, ceiling height, and natural light availability affect final requirements.
LED Strip Maintenance and Troubleshooting
Proper maintenance extends LED strip lifespan significantly. Understanding common issues enables quick resolution without professional assistance.
Regular Cleaning
Dust LED strips monthly using a soft, dry microfiber cloth. Avoid water or cleaning solutions that could damage electronics.
Clean strips maintain optimal brightness and prevent heat buildup. Gentle wiping preserves adhesive backing and strip integrity.
Connection Inspection
Check power connections quarterly for looseness or corrosion. Secure connections prevent flickering and ensure consistent operation.
Oxidation on copper contacts reduces conductivity. Clean contacts with isopropyl alcohol if discoloration appears.
Performance Monitoring
Note any brightness changes, color shifts, or dead sections. Early detection prevents larger system failures.
Document when issues began and environmental conditions. This information aids troubleshooting efforts.
Common Issues and Solutions
Flickering Lights
Flickering typically indicates loose connections or inadequate power supply. Check all connection points and ensure power supply meets wattage requirements.
Dim or Uneven Brightness
Voltage drop causes brightness reduction along strip length. Install additional power injection points or use higher voltage strips for long runs.
Color Inconsistency
RGB strips showing wrong colors suggest controller issues or damaged LEDs. Reset controllers first, then inspect strip for physical damage.
Adhesive Failure
Strips falling from mounting surfaces indicate insufficient surface preparation or low-quality adhesive. Use additional mounting clips or aluminum channels for secure installation.
Complete Section Failure
Dead sections between cutting marks suggest damaged circuits. Cut out failed section and reconnect remaining strips with appropriate connectors.
Overheating
Excessive heat shortens LED lifespan. Ensure adequate ventilation around strips and consider aluminum channels for better heat dissipation.
Important: If LED strips produce burning smells or visible damage, disconnect power immediately. Replace damaged sections rather than attempting repairs on compromised components.
Energy Efficiency and Cost Savings Analysis
LED strips deliver substantial energy savings compared to traditional bedroom lighting. Understanding consumption patterns helps optimize both performance and costs.
Consumption Comparison
A typical bedroom using 60-watt incandescent bulbs for ambient lighting consumes 480 watts for eight bulbs. Equivalent LED strip installation uses approximately 100-150 watts total.
This represents 70-80% energy reduction. Over a year of typical use, LED strips save significant electricity costs while providing superior lighting control.
Lifespan Economics
Quality LED strips last 50,000 hours on average. At 6 hours daily use, this equals nearly 23 years of operation.
Incandescent bulbs require replacement every 1,000 hours. Over LED strip lifespan, you would replace traditional bulbs 50 times, creating additional costs and waste.
Lighting Type
Initial Cost
Annual Energy Cost
Lifespan
10-Year Total Cost
LED Strips (50 feet)
$80-150
$15-25
50,000 hours
$230-400
Traditional Bulbs (8 × 60W)
$20-40
$85-120
1,000 hours
$950-1,440
CFL Bulbs (8 × 15W)
$40-60
$25-35
8,000 hours
$330-470
LED strips provide the lowest total cost of ownership. Initial investment pays for itself within 2-3 years through energy savings alone.
Complete Your Bedroom Lighting Project
Find specialty LED strips including waterproof options, ultra-bright versions, and custom-length solutions for unique bedroom applications.
Safe LED strip installation protects your home and ensures long-term reliability. Following established guidelines prevents hazards and optimizes performance.
Electrical Safety Guidelines
Always disconnect power before making electrical connections
Use only UL-listed or similarly certified LED products
Never exceed power supply rated wattage capacity
Ensure proper polarity when connecting strips to power
Avoid running strips through walls without proper conduit
Keep connections away from water sources in bedrooms
Use insulated connectors for all electrical joints
Install GFCI protection if using strips near moisture
Fire Prevention Measures
Maintain clearance between LED strips and flammable materials
Avoid covering LED strips with bedding or curtains
Use aluminum channels to dissipate heat effectively
Never coil excess LED strip length tightly
Inspect regularly for damaged insulation or exposed wires
Replace power supplies showing signs of overheating
Ensure adequate ventilation around transformers and controllers
Proper surface preparation ensures LED strips adhere securely and perform optimally throughout their lifespan.
Surface Checklist: Clean surfaces with isopropyl alcohol, allow complete drying, ensure temperature above 50°F during installation, test adhesion on small section first, apply firm pressure for 30 seconds along entire strip length.
Suitable Mounting Surfaces
Smooth, clean surfaces provide the best adhesion. Wood, painted walls, metal, and glass work excellently for LED strip mounting.
Avoid textured surfaces, wallpaper, or freshly painted walls. These compromise adhesive bond and may lead to strip failure.
Environmental Considerations
Bedroom humidity levels typically suit standard LED strips. Bathrooms or humid climates require waterproof-rated strips.
Temperature extremes affect performance. Maintain bedroom temperatures between 32°F and 104°F for optimal LED strip operation.
Matching LED Strips to Bedroom Design Styles
LED strip lighting adapts to any bedroom aesthetic. Strategic choices in color temperature, placement, and installation method complement your existing décor.
Modern Minimalist
Sleek aluminum channels with cool white LED strips create clean, architectural lines. Recessed installations maintain the minimalist aesthetic.
Focus on functional lighting with hidden sources. Under-bed and ceiling cove placements provide illumination without visible fixtures.
Traditional Classic
Warm white strips behind crown molding or integrated into traditional furniture enhance classic bedroom styles. The lighting feels timeless rather than trendy.
Avoid RGB or color-changing options in traditional spaces. Stick with warm tones that complement wood finishes and classic textiles.
Contemporary Eclectic
RGB LED strips enable bold color choices that match eclectic bedroom palettes. Feature walls with geometric patterns showcase LED versatility.
Mix different placement styles and color temperatures. The variety reflects eclectic design philosophy while maintaining cohesive lighting.
Industrial Style
Exposed LED strips in industrial bedrooms embrace the utilitarian aesthetic. Skip concealment and showcase the technology as design feature.
Pair with metal fixtures and concrete surfaces. Cool white temperatures complement industrial materials and color schemes.
Bohemian Cozy
Warm-toned LED strips create the inviting glow essential to bohemian bedrooms. Layer multiple placement zones for rich, textured lighting.
Behind tapestries, around mirrors, and under beds work beautifully. Dimmable options allow adjustment to match relaxed bohemian lifestyle.
Scandinavian Hygge
Soft, warm white LED strips enhance Scandinavian bedroom coziness. Focus on indirect lighting that creates the hygge atmosphere.
Install strips behind headboards and under floating shelves. The gentle glow complements light wood tones and neutral color palettes.
Seasonal and Holiday LED Strip Adaptations
RGB LED strips transform bedrooms for holidays and seasons. Smart programming creates festive atmospheres without permanent decorations.
Holiday Color Schemes
Program RGB strips for red and green during winter holidays, orange for autumn, pastels for spring celebrations. Instant seasonal transformation occurs with button presses.
Automated schedules can trigger holiday colors on specific dates. Your bedroom celebrates occasions without manual decoration efforts.
Seasonal Adjustments
Adapt color temperature seasonally. Cooler tones in summer create refreshing atmosphere while warmer temperatures add coziness during winter months.
Brightness levels also benefit from seasonal adjustment. Longer summer days need less artificial light than dark winter evenings.
LED Strip Lighting for Children and Teen Bedrooms
LED strips in kids’ bedrooms serve both functional and fun purposes. Safe, low-voltage options provide creative lighting without hazards.
Night Light Applications
Dim LED strips under beds or along baseboards create perfect night lights. Motion sensors activate lighting when children wake during night.
Warm white at low brightness prevents sleep disruption while providing safe navigation. This eliminates need for plug-in night lights.
Study Area Lighting
Install bright, neutral white LED strips above desks in teen bedrooms. Proper task lighting improves homework efficiency and reduces eye strain.
Separate controls let teens adjust study lighting independently from ambient bedroom illumination. This supports varied activities in single space.
Creative Expression
RGB LED strips allow children and teens to personalize bedroom spaces. Color choices reflect mood, favorite sports teams, or current interests.
Remote control operation gives kids autonomy over their environment. This independence supports healthy development and room ownership.
Safety remains paramount in children’s bedrooms. Use only low-voltage LED systems and secure all electrical connections beyond children’s reach.
Rental-Friendly LED Strip Installation Methods
Renters can enjoy LED strip lighting without damaging walls or violating lease agreements. Removable installation techniques leave no permanent marks.
Temporary Mounting Solutions
Command strips rated for appropriate weight secure LED channels without damaging paint. These removable adhesives support most residential LED installations.
Magnetic mounting systems work on metal surfaces. Some furniture pieces include magnetic-ready surfaces specifically for LED integration.
Furniture-Based Installations
Focus LED strip placement on movable furniture rather than walls. Under-bed, behind-headboard, and shelf-mounted options require zero wall modifications.
When you move, the entire lighting system relocates with your furniture. This approach maximizes investment value across multiple residences.
Renter’s Tip: Test removable adhesives on inconspicuous areas first. Follow manufacturer removal instructions precisely to avoid paint damage when moving out.
Budget Planning for Bedroom LED Projects
LED strip projects accommodate various budgets. Understanding cost components helps plan installations that deliver maximum value.
LED strip lighting offers unlimited possibilities for bedroom transformation. From subtle ambient glow to dynamic color-changing effects, these versatile lights adapt to your lifestyle.
The ideas presented throughout this guide demonstrate LED strips’ remarkable versatility. Whether you choose simple under-bed installation or comprehensive multi-zone systems, the impact on your bedroom atmosphere proves substantial.
Start with installations matching your immediate needs and budget. Expand your lighting system gradually as you discover new applications and techniques.
Energy efficiency, longevity, and creative flexibility make LED strips smart investments. Your bedroom deserves lighting that adapts to different moods, supports various activities, and creates the perfect environment for rest and relaxation.
The combination of practical illumination and aesthetic enhancement positions LED strip lighting as one of the most impactful bedroom upgrades available. Take inspiration from these ideas and create your personalized bedroom lighting masterpiece.
Planning the perfect wedding means every detail matters. Bridesmaids bouquets play a crucial role in your wedding day aesthetic. These beautiful arrangements complement your bridal bouquet while adding personality to your bridal party. Whether you’re dreaming of classic white roses or vibrant seasonal blooms, the right bridesmaid bouquet brings your wedding vision to life. Your…
Asking your closest friends to be part of your wedding party should be a moment they remember forever. The tradition of bridesmaid proposals has grown into an opportunity to show your appreciation and set the tone for your big day. Whether you’re planning an intimate gathering or a destination wedding, the way you pop the…
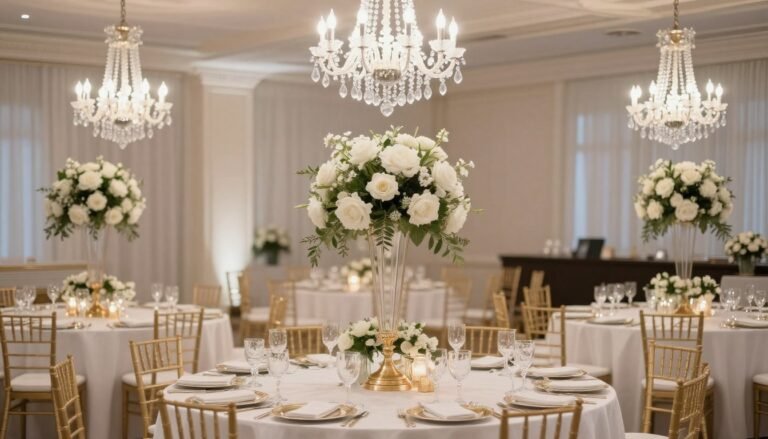
Your wedding reception is where memories are made, laughter is shared, and love is celebrated. The right wedding reception decorations can transform an ordinary venue into a magical wonderland that reflects your unique style and love story. Whether you’re dreaming of an elegant ballroom affair, a rustic barn celebration, or a whimsical garden party, the…
Picture yourself lounging beside your pool, surrounded by lush greenery, vibrant blooms, and elegant containers that frame your aquatic retreat. Strategic placement of planters around your pool area doesn’t just add beauty—it creates an immersive experience that transforms an ordinary swimming spot into a personal resort destination. Whether you’re looking to enhance privacy, define spaces,…
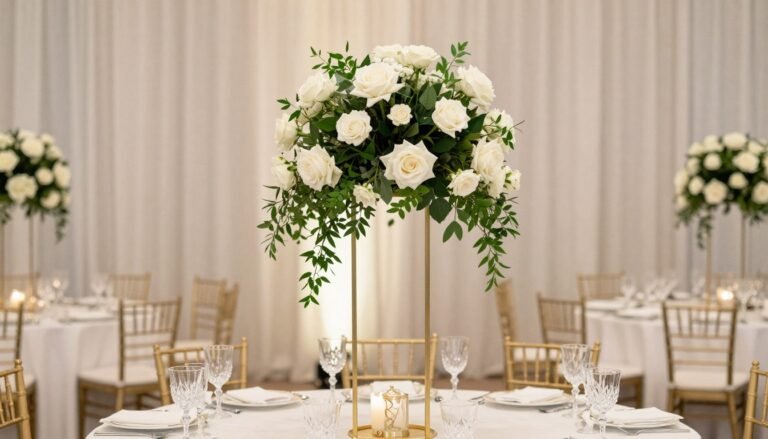
Your wedding table decor sets the tone for your entire reception experience. These carefully designed spaces are where your guests will spend hours dining, conversing, and celebrating your love story. The perfect table design creates an atmosphere that reflects your personal style while providing both beauty and functionality. Whether you’re dreaming of elegant floral centerpieces,…
Receiving an invitation with “black tie optional” listed as the dress code can feel like navigating a fashion gray area. Not quite as rigid as black tie, yet more elevated than cocktail attire, this popular wedding dress code offers both flexibility and sophistication. This comprehensive guide will walk you through everything you need to know…