Refresh your home in an afternoon with a straightforward hanging planter diy that adds green life without stealing tabletop room.
This friendly guide shows two easy options: a quick rope hanger for a small pot and a bold colander planter for outdoor color. Both paths are cheap, customizable, and perfect for renters or homeowners who want more greenery.
You’ll learn prep steps like paint or seal, simple assembly, and the right hardware for secure mounting. Expect clear tips on weight, drainage, and leveling so the finished piece looks modern and stays safe over time.
Customization is encouraged — pick a color, rope thickness, fringe length, and pot style that suits your room and plant choices. The result is a clean, classic look inspired by macramé but much simpler, so you can finish the project in one afternoon.
Key Takeaways
Two beginner-friendly options: rope hanger and colander approach.
Quick build time—complete the project in an afternoon.
Customize color, cord, and pot style to match your space.
Safety first: check weight limits, drainage, and secure hardware.
Perfect for adding plants without losing surface space.
Why a Hanging Planter Works in Any Space
A well-placed hanging pot can change how a room feels and functions in minutes.
Save surface space instantly. Suspended containers free up shelves, counters, and windowsills so small apartments can host more green without clutter.
Fill vertical gaps with style. A single pot visually anchors tall, narrow cutouts or empty corners. That adds height and interest without taking floor space.
Porch hooks and patio ceilings are perfect spots to add color and curb appeal. A bright container at eye level greets guests and brightens the entry.
Beginner-friendly, quick projects
Low supplies, low cost, and a short time commitment make these projects ideal for first-timers. Most builds finish in an afternoon and cost less than store-bought alternatives.
Flexible placement: move the hanger from a corner to a sunny window.
Seasonal swaps: swap plants or height for changing light and weather.
Two easy formats: choose a slim rope option for narrow indoor spaces or a bold colander option for outdoor impact.
Hanging Planter DIY Materials and Tools to Gather
Start by collecting a few smart supplies so the project moves smoothly. Having everything on hand cuts interruptions and helps you finish in one afternoon.
Plant and container choices
Containers: pick a classic terra cotta pot, a metal colander, or a repurposed container that can drain and hold weight.
Plant note: succulents stay compact and light, while flowering annuals fill a pot and need stronger hardware.
Hanging supplies
Choose jute rope for knot-based hangers or jack chain for metal containers. Add S-hooks and a ceiling-rated screw hook for secure mounting.
Optional finishing supplies and little helpers
For metal, wipe with white vinegar, prime with Rust-Oleum Ultra Cover 2X, paint (example: Rust-Oleum American Accents Ultra Cover Berry Pink), and seal with clear coat. For terra cotta, use outdoor acrylic paint and a clear coat.
Colander kit: stainless colander, primer, paint, clear coat, coffee filters or burlap, chain or twine, S-hooks, wire cutters.
Little helpers: tape to hold strands while tying, and wire cutters to cleanly size chain pieces.
Gather everything before you begin. That way you can focus on assembly and style, not a last-minute run to the store.
Choose Your Style: Rope Hanger vs. Hanging Colander Planter
Choose between a minimal cord style for narrow spots and a vibrant metal option for curb appeal.
Best for succulents and narrow spaces: simple rope plant hanger
Indoor-friendly: The rope hanger saves surface area and reads clean and modern.
Plant match: Small succulents or a compact pot work best because they stay light and steady.
Best for bold curb appeal: painted colander planter with flowers
Outdoor pop: A painted colander filled with petunias or marigolds brings immediate color to a porch.
Practical edge: The metal bowl already drains well, so it handles fuller flowering plants.
“If you want fast and simple indoors—rope; for curb appeal and bold color—colander.”
Location: rope hangers shine indoors; metal colanders sing on porches.
Difficulty: rope needs knots and measuring; colanders need paint prep and balanced hardware.
Style: rope reads soft and neutral; painted metal feels bright and playful.
Feature
Rope Hanger
Painted Colander
Best location
Indoors, narrow spots
Porch, entryway, outdoor hooks
Plant type
Succulents, small pots
Petunias, marigolds, fuller flowers
Skill level
Beginner (knots, measuring)
Beginner (paint prep, hooks)
Visual feel
Neutral, soft
Bright, country-porch
Quick decision shortcut: If you want a fast, simple indoor project—pick the rope. If you want curb appeal and color outdoors—pick the colander. Both are weekend-friendly and fun to customize.
Prep Your Pot or Planter for Hanging Success
Before you assemble cords or chains, spend a bit of time prepping the container. That extra step makes a big difference in how long the finish lasts and how cleanly the piece behaves when you water the plant.
Painting a terra cotta pot
Quick tip: Two thin coats beat one thick coat. If you want a refreshed pot, sand any rough spots, wipe with a damp cloth, and apply outdoor acrylic paint.
Why outdoor paint? Terra cotta soaks up moisture. Outdoor paint resists tackiness after repeated watering. Paint a few inches down the inside rim so the visible area still looks finished once soil and the plant sit inside.
If you plan to keep this pot indoors, consider covering the drainage hole on the bottom with a couple of layers of duct tape or use a drip tray to protect your floor.
Painting a metal colander
Start by wiping the metal with white vinegar to remove oils and residue. Let it dry fully.
Spray one coat of Rust-Oleum Ultra Cover 2X Primer (dry ~2 hours).
Apply your color coat (example: Rust-Oleum Berry Pink).
Finish with a clear coat and let the whole piece cure overnight before adding soil.
Note: Proper dry times cut scuffing and chipping risk when you handle the finished piece.
Drainage decisions for indoor vs. outdoor
Outdoors: leave drainage open so rain and watering escape. This prevents root rot and keeps fuller garden plants healthy.
Indoors: block the bottom hole with tape or use a catch tray under the pot. That protects floors and carpets from drips.
Container
Prep Steps
Dry Time
Drainage Advice
Terra cotta pot
Clean, sand, two thin coats outdoor paint; paint few inches inside rim
Touch dry in 1–2 hours; cure per paint label
Indoors: tape bottom hole or use tray; Outdoors: leave open
Metal colander
Vinegar wipe, prime (Rust-Oleum Ultra Cover 2X), paint, clear coat
Primer ~2 hours; overnight after clear coat
Best left open for outdoor use; indoors use liner and tray
Repurposed container
Clean, seal porous spots, paint if desired
Follow product label for coatings
Decide based on material and indoor surface protection
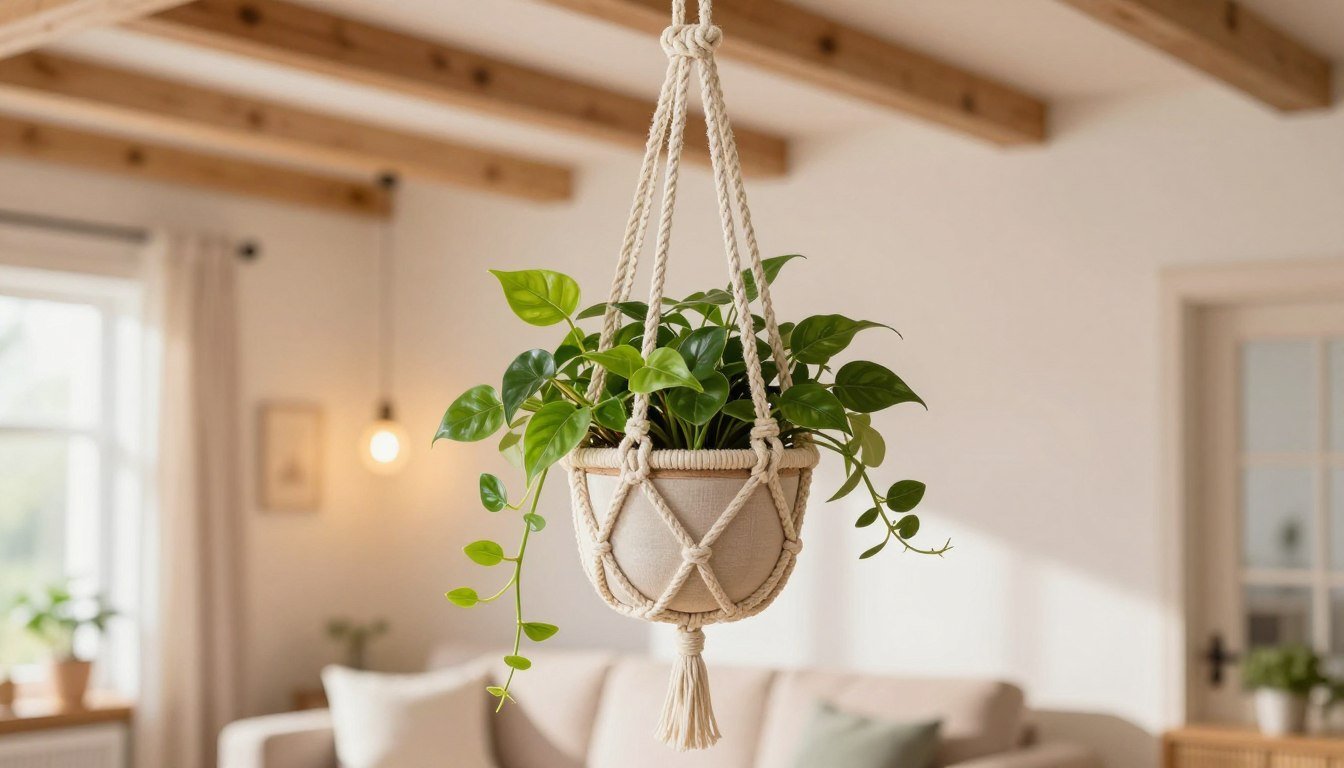
Make a Simple Rope Plant Hanger with Knots
With eight strands and a few repeatable ties, you can craft a balanced cord hanger fast. Follow these short steps for a tidy result that keeps your plant level and secure.
Cut rope to the right length
Cut eight rope strands long enough to cover pot height, allow for multiple knot levels, and leave extra for a top loop and bottom fringe. Measure twice for the best length and add a few extra inches in case you adjust knots.
Create the base knot and divide into pieces
Tie a base knot several inches from the ends to control how much fringe hangs below the bottom. Turn the pot upside down and split the strands into four even pairs so the support is balanced.
Build knot “levels” and finish
Tie paired knots just past the pot base, then link one strand from each pair with a neighboring strand to form the next level. Use tape to hold ropes even while you work.
Stop the final knot level about a half inch below the rim so the rope supports the pot without covering the top edge. Gather strands, tie the top hanger knot at the desired length, check that the pot hangs level, then trim the fringe for a clean look.
Build a Hanging Colander Planter with Chain or Twine
Turn an ordinary kitchen colander into a sturdy plant display using chain and a quick liner. This method keeps soil in place while letting water drain freely through the holes.
Line and fill
Line the colander with five coffee filters or a round of burlap so soil won’t wash out. The liner still allows drainage and airflow.
Fill method: add about 1 inch of potting soil over the liner, nestle your plants, then firm in more soil until the liner is hidden. This reduces mess and keeps roots snug.
Chain setup for balance
Cut three equal pieces of chain and attach two toward the back and one at the front. Use S-hooks and an all-purpose screw hook to gather the three pieces at the top.
Tip: Twine works for a softer look, but chain is easier to balance under heavier blooms. Test-hold the assembly before final hanging to make sure the hook feels secure and the planter sits level.
Step
Items
Why it matters
Line colander
Coffee filters or burlap (5)
Prevents soil loss, allows drainage
Fill
About 1 inch soil + plants
Stops mess and protects roots
Attach chain
3 equal pieces, S-hooks, top hook
Ensures stable, balanced hanging
Install the Hook and Hang It the Right Way
Mounting the hook correctly is the last bit of work that makes your hanger ready to enjoy.
Choose hardware by weight and location
Match the hook to the full weight — pot, soil, and a watered plant. Use a ceiling-rated screw hook for the rope hanger. For chain setups, gather S-hooks and an all-purpose hook that meet the same weight rating.
Tip: Screw into a joist or stud whenever possible. If not, use a rated anchor made for the load so the hardware won’t loosen over time.
Balance and leveling before you trim
Hang the assembly temporarily and step back. Check that the pot sits level and doesn’t pull to one side. For chain systems, use the 2-back/1-front pattern and even chain lengths for balance.
Trim last: Only cut rope ends or shorten chain after you confirm the pot is perfectly even.
“Hang it, check it, then tidy the ends — that small routine saves time and trouble.”
Action
How to do it
Why it matters
Pick hook
Match hook rating to filled weight
Prevents failures when plant is watered
Mount
Use stud/joist or proper anchor
Keeps hardware from loosening
Level
Hang temporarily, adjust rope/chain lengths
Ensures pot sits straight and stable
Final test
Lift and lower gently, check clearance
Confirms secure hold and avoids bumps
Do a quick clearance check so the pot won’t hit doors, heads, or pets in a high-traffic spot. After a gentle lift test and final trim, your hanger is ready to enjoy.
Styling Ideas and Customizations for a One-of-a-Kind Look
Personal touches—color, texture, and placement—give your pot real personality. Small changes alter the mood from modern to boho or from country to industrial.
Rope tweaks that change the whole feel
Thicker rope creates a chunkier, modern look. Longer fringe adds boho movement. Try doubling strands throughout for a fuller hanger that feels plush.
Color, texture, and material pairings
Bright paint works best outdoors—berry pinks and bold blues pop by the front door. Neutral tones blend indoors and keep focus on the plant.
Mix textures: matte-painted pots with natural jute rope, or shiny stainless colanders with chain for an industrial edge.
Placement ideas and a budget upgrade
Hang in corners near windows, fill awkward wall cutouts, float above shelves, or add a porch hook near the entryway for curb appeal.
Thrift-store finds: scout a unique colander or pot to repaint for a one-of-a-kind piece.
Optional lighting: add a small solar light near outdoor displays for night-time charm.
“A single color swap or rope change can make the whole setup feel new.”
Care, Maintenance, and Safety Tips for Hanging Plants
Simple routines extend the life of your plants and protect floors from drips. A few small habits save time and keep your display tidy.
Watering without mess: protecting floors and managing drainage
Indoors, plan for drips by sealing the drainage hole with tape or using a liner and tray. Move the pot to a sink or porch for watering when possible to avoid wet floors.
Tip: Avoid overwatering. Allow soil to dry between waterings to limit weight and leaks.
Sun, heat, and reliable plant picks
For hot, sunny porches pick heat-tolerant choices like petunias, marigolds, lantana, and begonias. These bloom well and tolerate strong afternoon sun.
Metal bowls and colanders drain fast, so water more often in heat to keep roots healthy.
Quick safety checklist: knots, hooks, and weight over time
Weekly checks: inspect knots for slipping and look for any rope fraying. Confirm hooks remain tight and match the full weight of pot, soil, and a watered plant.
Reassess weight as plants grow or soil compacts; tighten hardware when needed.
Care Area
Action
Frequency
Watering
Use liner/tray or tape hole; avoid overwatering
As needed — check soil weekly
Plant health
Rotate pot, trim dead blooms, refresh soil
Every 2–4 weeks
Hardware
Check knots, inspect for fray, tighten hooks
Weekly to monthly
Maintenance routine: rotate the plant now and then so growth stays even. Trim spent blooms to keep flowers full. Swap out soil or plants each season for a fresh look.
Do a quick safety check each time you water: knots, rope, and hooks.
If you spot fray or slip in any knot, retie or replace that cord immediately.
Follow this simple step to keep your display safe and lasting.
Conclusion
Conclusion: This short DIY wraps the essentials into two easy options: a clean rope hanger for a classic pot, or a chain/twine colander for bold porch color. Each choice is inexpensive, quick, and fun to customize.
Key to success: prep well—paint, prime, or seal metal and ceramic—and measure carefully. Take the extra moment to level the hanger before you trim the ends so the final result looks and performs its best.
Treat this as a repeatable project. Once you build one, it’s simple to make a matching set for a sunny corner, craft one as a gift, or swap seasonal plants to keep your space fresh.
Final reminder: do a quick safety check now and then—inspect hooks, cords, and balance—so your new display stays secure and beautiful over time.
FAQ
What materials do I need to make a simple rope hanger?
Gather a sturdy plant pot or repurposed container, natural or synthetic rope (cotton, jute, or nylon), scissors, a tape measure, and a hook for hanging. Optional supplies include paint, primer, and a clear coat if you want to finish the pot. Pick rope length that accounts for knots and a bit of fringe at the bottom.
How long should I cut the rope for a macramé-style hanger?
Measure the drop you want and add extra for knots. A good rule is to cut four or six strands about three times the finished hanging length. That gives enough rope for base knots, mid-level knots, and trimming while keeping the pot supported evenly.
Can I use a colander or kitchen item as a container?
Yes. Metal colanders make great containers because of built-in drainage. Clean and prep metal by wiping with vinegar, priming, and painting if desired. Line the colander with a coffee filter or burlap to keep soil in place before adding plants and potting mix.
How do I ensure drainage without making a mess indoors?
For indoor use, either choose a pot with a saucer or line the hanging container with a drip-proof layer such as a plastic nursery pot inside the decorative container. Another option is to add a layer of pebbles at the bottom to trap excess water, then use less frequent shallow watering.
What type of hook or hardware should I use to hang a plant safely?
Match the hook to the weight. Lightweight plants can use a standard screw hook into a ceiling joist or beam. Heavier pots need a heavy-duty hook or toggle anchors rated for the load. When in doubt, use a rated ceiling hook sold at hardware stores and attach into solid wood or a proper anchor.
How do I balance the hanger so the pot sits level?
Before final trimming, put the pot in the hanger and adjust knot positions so the cord lengths are even and the container sits level. Re-tie or slide knots where needed. Test by lifting the full assembly to ensure it hangs straight under weight.
Which plants work best for suspended containers?
Choose plants suited to the light and wind exposure of the hanging spot. Trailing plants like pothos, string of pearls, or ivy do well, and many annuals such as petunias and marigolds thrive outdoors. Succulents suit bright, sheltered spots. Match plant needs to your location.
How often should I water a suspended pot?
Watering frequency depends on plant type, pot size, and location. Small hanging containers dry faster; check soil moisture with your finger and water when the top inch feels dry. For hanging containers with little drainage control, water more carefully to avoid drips and overwatering.
Can I paint a terra cotta or metal container before hanging?
Absolutely. Use an outdoor-grade paint and primer for durability. For metal, clean with a vinegar wipe, apply primer, then paint and seal with a clear coat. Terra cotta benefits from a water-resistant outdoor paint to reduce moisture absorption and extend life outdoors.
How do I finish the top knot for a clean look?
Gather the strands above the pot, tie a tight decorative knot (like a gathering knot or simple overhand loop), and trim excess to create a tidy hanger. Seal natural fibers with a dab of clear glue if needed to prevent fraying.
Is rope or chain better for outdoor use?
Chain and galvanized hardware resist weather and last longer outdoors. Natural rope looks great but may break down faster in sun and rain. Synthetic rope (poly or nylon) offers a middle ground—weather resistant with a softer look than metal.
How do I handle weight limits and safety over time?
Regularly inspect knots, rope, and hooks for wear or damage. Replace frayed rope and tighten or change hardware that shows corrosion. Consider the saturated weight after watering; choose hooks and anchors with a safety margin above the expected load.
That dark, dusty space beneath your feet holds untapped potential. An unfinished basement doesn’t have to remain a neglected storage area or a place you dread visiting. With some creativity and budget-friendly approaches, you can transform this raw canvas into a functional, inviting space your family will actually use and enjoy. I once viewed my…
Your small backyard holds incredible potential waiting to be unlocked. Many homeowners believe limited space means limited possibilities, but that couldn’t be further from the truth. With smart design choices and creative landscaping ideas, even the smallest yard can become your favorite outdoor room. Small backyard landscaping requires thoughtful planning and strategic design decisions. Every…
Your backyard holds incredible potential after the sun goes down. The right outdoor lighting transforms a simple yard into an enchanting outdoor living space where memories are made and moments are savored. Whether you want to create a cozy atmosphere for evening gatherings or improve safety along dark pathways, thoughtful lighting design makes all the…
Asking your closest friends to stand by your side on your wedding day represents one of the most meaningful moments in your bridal party journey. The tradition of presenting bridesmaid proposal gifts has evolved into a heartfelt way to show appreciation before the big day even begins. Your bridesmaids will invest time, energy, and resources…
Asking your closest friends to be part of your wedding party should be a moment they remember forever. The tradition of bridesmaid proposals has grown into an opportunity to show your appreciation and set the tone for your big day. Whether you’re planning an intimate gathering or a destination wedding, the way you pop the…
Your wedding day represents one of life’s most memorable moments. The friends standing beside you make this moment even more special. Asking your closest friends to be bridesmaids deserves thoughtfulness and creativity. A bridesmaid proposal sets the tone for your entire wedding journey together. This moment creates lasting memories. Your bridal party will remember how…