The Ultimate Guide to DIY Planters: Creative & Budget-Friendly Ideas
Creating your own DIY planters is a rewarding way to showcase your plants while expressing your creativity. Whether you’re looking to add greenery to your home, patio, or garden, handmade planters offer endless possibilities for customization at a fraction of the cost of store-bought options. In this guide, we’ll explore simple yet stunning DIY planter projects that transform ordinary materials into extraordinary homes for your beloved plants. Get ready to roll up your sleeves and bring new life to your space with these creative planter ideas!
This Website contains affiliate links. That means I may earn a small commission if you purchase through my links, at no extra cost to you.
Essential Materials for DIY Planters
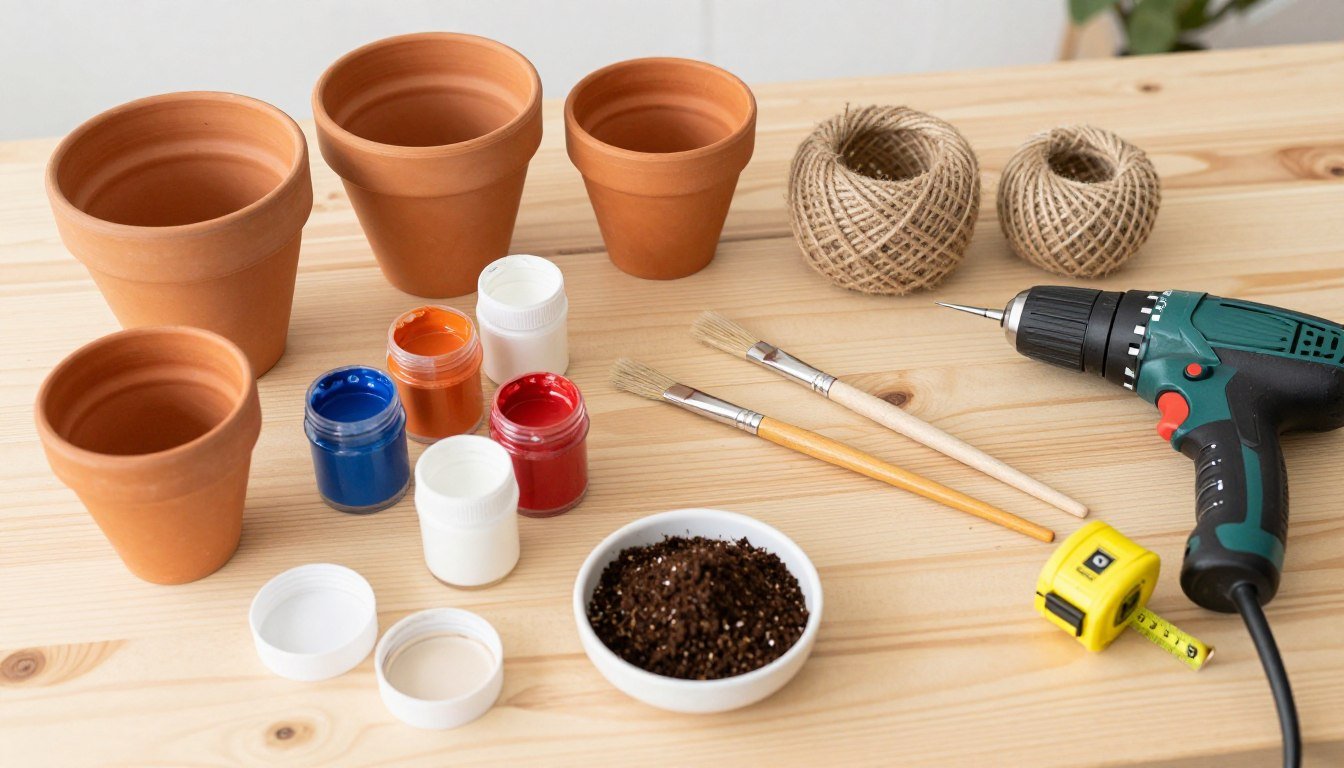
Before diving into specific projects, let’s look at the basic supplies you’ll need for most DIY planter projects. Having these materials on hand will make the creative process smoother and more enjoyable.
- Base containers: Terracotta pots, plastic containers, wooden boxes, or upcycled items like tin cans
- Tools: Drill with bits, sandpaper, measuring tape, and craft scissors
- Decorative materials: Acrylic paint, jute rope, wood stain, or patterned fabric
- Planting supplies: Potting soil, pebbles for drainage, and landscape fabric
- Finishing touches: Clear sealant or polyurethane for weatherproofing
Modern Concrete Planters
Concrete planters add a sleek, contemporary touch to any space. Despite their high-end appearance, they’re surprisingly easy and inexpensive to make at home.
Related Posts:


Materials Needed:
- Concrete mix
- Plastic containers for molds (two sizes that nest)
- Cooking spray or petroleum jelly
- Mixing bucket and stir stick
- Sandpaper (medium grit)
- Gold spray paint (optional for decorative accents)
Step-by-Step Instructions:
- Mix the concrete according to package instructions until it reaches a thick, pancake-batter consistency.
- Coat the inside of the larger container and the outside of the smaller container with cooking spray or petroleum jelly.
- Pour concrete into the larger container, filling it about halfway.
- Press the smaller container into the concrete, leaving space at the bottom for drainage. Weigh it down if necessary.
- Let the concrete cure for 24-48 hours, following package instructions.
- Once cured, carefully remove both containers to reveal your planter.
- Sand any rough edges and drill a drainage hole in the bottom if needed.
- For a decorative touch, paint the rim with gold spray paint or leave natural for a minimalist look.

Rustic Wood Planter Box
This charming wooden planter box brings warmth and rustic appeal to your garden or patio. It’s perfect for herbs, flowers, or small vegetables and can be customized to fit any space.
Materials Needed:
- Cedar fence boards or other weather-resistant wood
- Exterior wood screws
- Drill with drill bits
- Miter saw or hand saw
- Measuring tape and pencil
- Wood stain or exterior paint
- Landscape fabric
- Staple gun
Step-by-Step Instructions:
- Measure and cut your boards to create a box in your desired dimensions (recommended: 24″ long x 12″ wide x 12″ high).
- For each side, attach boards together by screwing them to small corner pieces of wood.
- Assemble the four sides by screwing them together at the corners.
- Create a base by cutting boards to fit inside the bottom of the box, leaving small gaps between boards for drainage.
- Attach the base to the sides with screws.
- Sand any rough edges for a smooth finish.
- Apply wood stain or paint in your desired color and allow to dry completely.
- Line the inside with landscape fabric, securing it with staples, to prevent soil from escaping through the drainage gaps.

Upcycled Tin Can Planters
Transform everyday tin cans into charming planters with this simple upcycling project. It’s an eco-friendly way to add color and personality to your windowsill or desk.
Materials Needed:
- Clean, empty tin cans (soup cans, coffee cans, etc.)
- Acrylic paint in your chosen colors
- Paintbrushes
- Clear acrylic sealer
- Hammer and nail (for drainage holes)
- Decorative tape, twine, or fabric scraps (optional)
Step-by-Step Instructions:
- Remove labels from cans and wash thoroughly.
- Use a hammer and nail to carefully punch several drainage holes in the bottom of each can.
- Apply a base coat of paint to the outside of the can and let dry completely.
- Add decorative patterns, stripes, or designs with contrasting paint colors.
- For added texture, wrap twine around the can, securing with hot glue, or apply decorative tape in patterns.
- Once paint is completely dry, spray with clear acrylic sealer to protect from moisture.
- Add a layer of small rocks at the bottom for drainage, then fill with potting soil and your chosen plants.

Macramé Hanging Planters
Macramé hanging planters add a bohemian touch to any room while maximizing your space. This project is perfect for displaying trailing plants like pothos or string of pearls.
Materials Needed:
- Macramé cord (3-4mm thickness)
- Wooden ring (2-3 inches in diameter)
- Scissors
- Measuring tape
- Plant pot (that will fit inside your finished macramé hanger)
Step-by-Step Instructions:
- Cut eight pieces of cord, each about 8 feet long.
- Fold each cord in half and attach to the wooden ring using a larks head knot (fold cord in half, pull loop through ring, then pull cord ends through loop).
- Separate cords into four groups of four strands each.
- Starting about 4 inches below the ring, tie a square knot with each group.
- Continue creating rows of square knots, alternating the cord groupings to create a diamond pattern.
- After 3-4 rows of knots, create a “basket” by bringing all cords together and tying a gathering knot.
- Trim excess cord or add decorative tassels to the bottom.
- Place your potted plant inside the macramé hanger and hang from a ceiling hook or bracket.

Geometric Painted Planters
Transform plain terracotta pots into modern art pieces with this geometric painting technique. These eye-catching planters make a bold statement in any room.
Materials Needed:
- Terracotta pots (any size)
- Acrylic paint in 3-4 complementary colors
- Painter’s tape
- Paintbrushes
- Clear acrylic sealer
Step-by-Step Instructions:
- Clean terracotta pots and allow to dry completely.
- Apply a base coat of white or light-colored paint and let dry.
- Use painter’s tape to create geometric patterns—triangles, stripes, or color blocks work well.
- Paint each section with your chosen colors, allowing each to dry before removing tape.
- For clean lines, remove tape while paint is still slightly wet.
- Once completely dry, apply a clear acrylic sealer to protect your design.
- Allow sealer to dry before adding plants.

Care Tips for Plants in DIY Planters
Creating beautiful planters is just the first step—keeping your plants healthy requires proper care. Here are essential tips to ensure your plants thrive in their new homes.
Drainage Considerations
Proper drainage is crucial for plant health. Without it, roots can rot and plants will die. For any DIY planter:
- Always include drainage holes in the bottom of your planter
- Add a layer of pebbles or gravel at the bottom before adding soil
- For planters without drainage holes, create a drainage layer with activated charcoal and pebbles
- Consider using landscape fabric to prevent soil from washing out through drainage holes
Watering Tips
Different planters may require adjusted watering schedules:
- Terracotta and concrete planters absorb moisture, so plants may need more frequent watering
- Plastic, metal, or sealed wood containers retain moisture longer
- Always check soil moisture before watering—stick your finger about an inch into the soil
- Water thoroughly until water drains from the bottom, then empty any water that collects in saucers
Choosing the Right Plants
Match your plants to your planter style and location:
- For small planters: succulents, cacti, or small herbs
- For hanging planters: trailing plants like pothos, string of pearls, or spider plants
- For large planters: statement plants like fiddle leaf figs, monstera, or multiple smaller plants
- Consider light conditions where your planter will be placed

Seasonal DIY Planter Ideas
Keep your DIY planters fresh and exciting by updating them with the changing seasons. Here are some creative ideas for each time of year:
Spring Planters
- Paint terracotta pots in pastel colors and plant spring bulbs like tulips or daffodils
- Create a tiered herb garden using wooden crates painted in fresh green or yellow
- Repurpose rain boots as whimsical planters for colorful pansies
Summer Planters
- Transform a vintage watering can into a planter for bright zinnias or marigolds
- Create a succulent garden in a shallow wooden box painted in vibrant blues
- Use colorful tin buckets for growing cherry tomatoes or strawberries
Fall Planters
- Hollow out a pumpkin to create a seasonal planter for mums or ornamental kale
- Paint terracotta pots in warm autumn hues and plant ornamental grasses
- Repurpose wooden apple crates for displaying fall-blooming flowers
Winter Planters
- Create concrete planters with embedded pine cones for winter interest
- Use galvanized metal containers for evergreen arrangements with red berries
- Transform wooden boxes into planters for winter-hardy plants like hellebores

Budget-Friendly DIY Planter Tips
Creating beautiful planters doesn’t have to break the bank. Here are some money-saving strategies for your DIY planter projects:
- Repurpose household items: Look around your home for potential planters—coffee cans, yogurt containers, old colanders, or even broken drawers can be transformed with a little creativity.
- Shop secondhand: Thrift stores, yard sales, and flea markets are treasure troves for unique containers that can become planters.
- Use leftover materials: Scrap wood, sample paint pots, and fabric remnants can all be repurposed for planter projects.
- Split the cost: Host a planter-making party where everyone brings one supply item to share.
- Start with seeds: Instead of buying mature plants, grow your own from seed packets for a fraction of the cost.

DIY Planter Inspiration Gallery
Looking for more ideas? Here’s a gallery of creative DIY planters to inspire your next project:


Start Creating Your Own DIY Planters Today
With these creative ideas and step-by-step instructions, you’re ready to start making your own beautiful DIY planters. Remember that the most important aspect of any DIY project is making it your own—don’t be afraid to experiment with colors, materials, and designs that reflect your personal style.
Whether you’re creating a single statement planter or a collection of coordinated containers, your handmade creations will add character and charm to your space while providing the perfect home for your beloved plants.
Ready to Get Started?
Gather your supplies and let your creativity bloom! Remember to use high-quality, vertical images for your Pins to maximize engagement.
Love these ideas? Follow our ‘DIY & Crafts’ board on Pinterest for more inspiration!