How to Build DIY Raised Planter Boxes: The Complete Step-by-Step Guide
Raised planter boxes transform ordinary outdoor spaces into thriving garden havens. These versatile structures elevate your plants, improve drainage, prevent back strain, and create defined garden spaces that look amazing. Whether you’re a seasoned gardener or just starting out, building your own DIY raised planter boxes gives you complete control over size, materials, and design while saving money compared to store-bought options.
This Website contains affiliate links. That means I may earn a small commission if you purchase through my links, at no extra cost to you.
In this comprehensive guide, I’ll walk you through everything you need to know to build beautiful, functional raised planter boxes that will last for years. From planning and material selection to step-by-step assembly instructions and planting tips, you’ll have all the knowledge you need to create the perfect raised garden for your space.
Would you like to save this guide?
We’ll email this complete DIY raised planter box tutorial to you so you can reference it while building!
Related Posts:


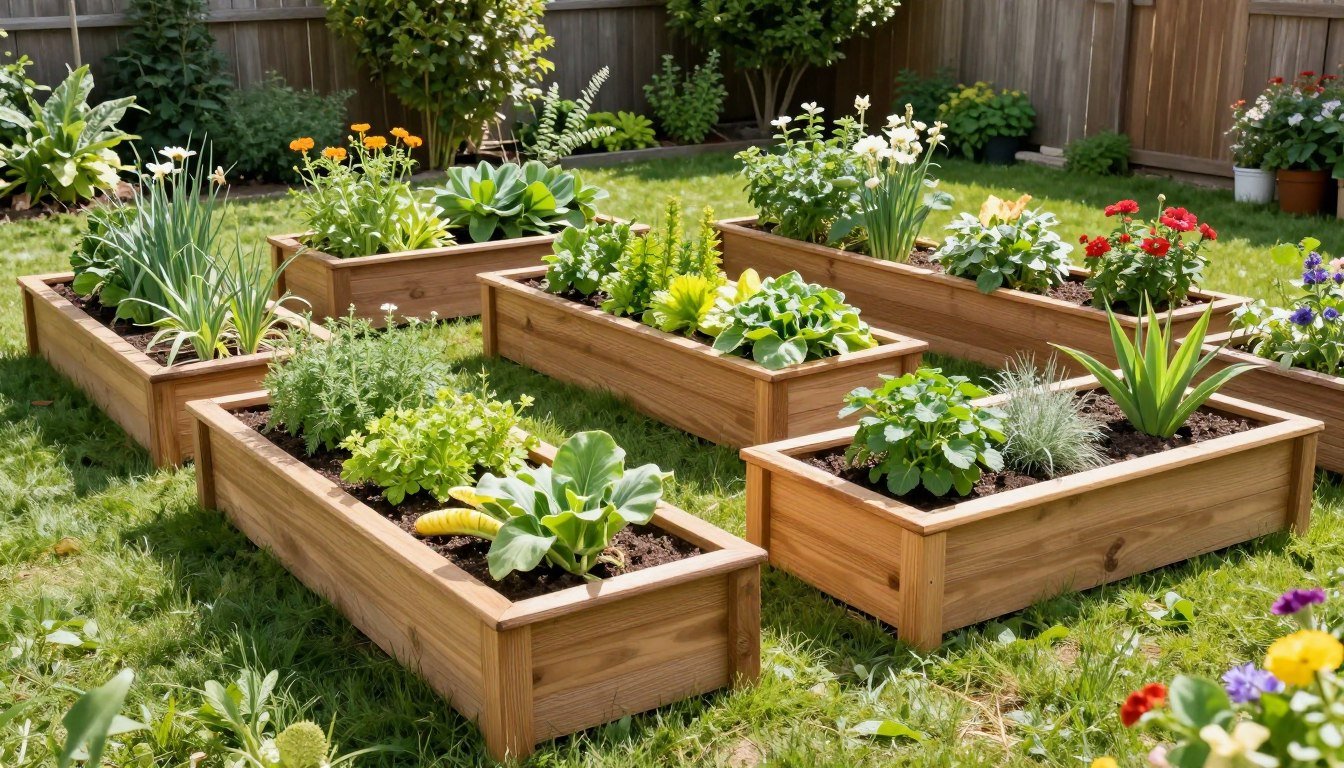
Benefits of DIY Raised Planter Boxes
Well-designed raised planter boxes create an organized, productive garden space
Garden Advantages
- Complete control over soil quality and composition
- Improved drainage prevents root rot and plant diseases
- Extended growing season as soil warms faster in spring
- Reduced weed pressure and easier maintenance
- Protection from lawn chemicals and soil contaminants
- Creates clear boundaries between garden and lawn areas
Practical Benefits
- Less bending and kneeling reduces back strain
- Creates defined garden spaces in any yard configuration
- Prevents soil erosion during heavy rains
- Keeps pets and small children from disturbing plants
- Deters ground-dwelling pests like gophers and moles
- Adds architectural interest and visual appeal to your landscape
Planning Your DIY Raised Planter Boxes

Planning your layout before building ensures optimal garden placement and dimensions
Choosing the Perfect Location
Before gathering materials or making your first cut, take time to carefully plan your raised planter box project. The right location is crucial for plant success and your gardening enjoyment.
Sun Exposure
Most vegetables need 6-8 hours of direct sunlight daily. Observe your yard throughout the day to identify the sunniest spots. Remember that sun patterns change seasonally, so consider year-round exposure if you plan to garden in multiple seasons.
Water Access
Position your planter boxes within reach of a water source. Hauling watering cans across the yard quickly becomes tiresome. Consider installing a drip irrigation system for effortless watering, especially during hot summer months.
Determining the Right Size
The perfect dimensions for your raised planter boxes depend on your space, gardening goals, and physical capabilities.
Width Considerations
Keep planter boxes no wider than 4 feet so you can easily reach the center from either side without stepping into the bed (which compacts soil). For beds accessible from only one side, limit width to 2-3 feet.
Length Options
Length is more flexible but typically ranges from 4-8 feet. Longer boxes require additional support to prevent bowing under soil pressure. Consider creating multiple smaller boxes rather than one very long one.
Height Decisions
The ideal height depends on what you’ll grow and your ergonomic needs:
- 12 inches: Minimum height for most vegetables
- 16-18 inches: Ideal for most garden plants, including root vegetables
- 24-36 inches: Excellent for reducing bending (but requires more soil)
Spacing Between Boxes
Allow at least 24-36 inches between planter boxes for comfortable access with garden tools. If you’ll need to maneuver a wheelbarrow, increase spacing to 36-48 inches. Consider how plants might overflow the edges when mature.
Ready to start building?
Let’s gather the materials you’ll need for your perfect DIY raised planter boxes!
Materials and Tools for DIY Raised Planter Boxes

Gather all materials and tools before starting your project for efficient building
Lumber Options for Long-Lasting Planter Boxes
Best Wood Choices
- Cedar: Naturally rot-resistant, beautiful color, 10-15 year lifespan (cedar boards)
- Redwood: Extremely durable, naturally insect-resistant, 15-20 year lifespan
- Cypress: Good rot resistance, attractive grain, 7-10 year lifespan
- Douglas Fir: More affordable, moderately rot-resistant when sealed, 5-7 year lifespan
Woods to Avoid
- Pressure-treated lumber: Contains chemicals that may leach into soil
- Railroad ties: Often treated with creosote, unsafe for food gardens
- Composite materials: Can leach plastics and chemicals into soil
- Pine: Rots quickly unless heavily treated, 2-3 year lifespan
Materials List for a Standard 4’x8′ Raised Planter Box
| Material | Quantity | Purpose |
| 2″×6″ cedar boards (8′ long) | 6 | Side walls of the planter box |
| 4″×4″ cedar posts (8′ long) | 1 | Corner supports (cut into four 16″ pieces) |
| 3″ exterior deck screws | 1 box (50+) | Connecting boards to corner posts |
| Landscape fabric | 1 roll | Weed barrier for bottom of box |
| Hardware cloth (1/4″ or 1/2″ mesh) | 4’×8′ piece | Optional – prevents burrowing pests |
| Staples or small screws | 1 box | Attaching hardware cloth/landscape fabric |
| Non-toxic wood sealant | 1 quart | Optional – extends wood life |
| Raised bed soil mix | ~20 cubic feet | Filling the planter box |
Essential Tools
- Measuring tape
- Pencil for marking
- Power drill with drill bits
- Circular saw or miter saw
- Level
- Square for checking corners
- Safety glasses and gloves
- Clamps (optional but helpful)
- Staple gun (if using fabric/mesh)
- Sandpaper (120-150 grit)
Safety First!
Always wear appropriate safety gear when working with power tools. Use eye protection, gloves, and hearing protection as needed. Work in a well-ventilated area when applying sealants. Before digging, check for underground utilities by calling 811 (in the US).
Step-by-Step Guide to Building DIY Raised Planter Boxes

Careful measuring and marking ensures your planter box will be square and level
Step 1: Prepare Your Materials

Cut all boards to the correct dimensions before assembly begins
- If using a wood sealer, apply it to all boards before cutting and allow to dry completely according to manufacturer instructions.
- Cut your 4×4 post into four equal pieces, each 16″ long (or your desired height).
- For a 4’×8′ box, leave the 8′ boards at full length for the long sides.
- Cut two of your 2×6 boards in half to create four 4′ pieces for the short ends.
- Sand any rough edges to prevent splinters.
Step 2: Assemble the Short Sides First

Attach the short side boards to the corner posts using deck screws
- Lay two 4×4 corner posts on a flat surface, positioned 4′ apart (or your desired width).
- Place three 4′ boards (2×6) along the posts, stacking them to create the short end wall.
- Make sure the ends of the boards are flush with the outer edges of the posts.
- Pre-drill holes to prevent splitting, then secure each board to the posts using two 3″ deck screws per connection point.
- Repeat this process to create the second short end.
Pro Tip: Use a square to ensure your corners are at perfect 90-degree angles. This will make the final assembly much easier and result in a sturdier planter box.
Step 3: Attach the Long Sides

Connect the long sides to the short ends to complete the box frame
- Stand the two short end assemblies upright, with the corner posts facing inward.
- Position the first long 8′ board along the bottom edge between the two short ends.
- Make sure the board is level and flush with the bottom of the corner posts.
- Pre-drill, then attach the board to the corner posts using two screws at each end.
- Repeat with the remaining long boards, stacking them to match the height of the short sides.
- Complete both long sides following the same process.
Step 4: Add Support for Longer Boxes (Optional)

Add middle supports to prevent bowing on longer planter boxes
For planter boxes longer than 6′, additional support prevents the sides from bowing outward under soil pressure:
- Cut two pieces of 2×4 lumber to the height of your planter box.
- Position these supports at the midpoint of each long side, on the inside of the box.
- Pre-drill holes, then attach the supports using 3″ deck screws from the outside of the box.
- For extra reinforcement, you can add a cross-brace between the two middle supports.
Step 5: Add Drainage Holes

Proper drainage is essential for healthy plants in raised planter boxes
Good drainage is crucial for plant health. If your planter has a solid bottom, add drainage holes:
- Drill ½” diameter holes in the bottom boards, spaced approximately 6″ apart.
- If your planter sits directly on soil without a bottom, you can skip this step.
Step 6: Install Weed Barrier and Pest Protection (Optional)

Hardware cloth and landscape fabric protect your garden from pests and weeds
- For protection against burrowing pests, cut hardware cloth to fit the bottom of your planter box.
- Secure the hardware cloth to the bottom edges using staples or small screws.
- Cut landscape fabric to size and place it over the hardware cloth, extending up the sides by a few inches.
- Secure the fabric with staples, ensuring it’s taut but not stretched too tight.
Pro Tip: If placing your planter box on concrete or a hard surface, create a false bottom by installing cross supports 2-3″ from the bottom and laying boards across them. This creates space for water to drain away.
Finishing and Setting Up Your DIY Raised Planter Boxes

Position your completed planter box in its final location before filling with soil
Step 7: Position Your Planter Box
- Move your completed planter box to its final location before filling it with soil (it will be very heavy afterward).
- Use a level to ensure the box sits flat. Adjust the ground beneath if necessary.
- If placing multiple boxes, ensure proper spacing for access paths.
Step 8: Fill Your Planter Box with Quality Soil

Layer your soil materials for optimal plant growth and drainage
For the best plant growth, fill your planter in layers:
- Bottom layer (optional): For deeper boxes, add a 4-6″ layer of organic material like small branches, leaves, or cardboard to reduce the amount of soil needed.
- Middle layer: Add a 4-6″ layer of compost or well-rotted manure.
- Top layer: Fill the remaining space with a high-quality raised bed soil mix that combines topsoil, compost, and organic matter.
- Water thoroughly to help the soil settle, then add more soil if needed.
“The quality of your soil determines the quality of your harvest. Invest in good soil, and your plants will reward you abundantly.”
Step 9: Add Finishing Touches (Optional)

Decorative trim and corner caps add a professional finish to your planter box
Consider these optional enhancements to improve functionality and appearance:
- Decorative trim: Add a 1×2 or 1×4 board along the top edge for a finished look and comfortable seating.
- Corner caps: Cover exposed 4×4 posts with decorative post caps.
- Trellis system: Install a trellis on one side for climbing plants like cucumbers or beans.
- Automatic irrigation: Set up a drip irrigation system for consistent watering.
- Plant markers: Add permanent plant markers to track what’s planted where.
Planting and Maintaining Your DIY Raised Planter Boxes

A well-planned raised planter box garden yields abundant harvests
Best Plants for Raised Planter Boxes
Vegetables
- Tomatoes
- Peppers
- Lettuce & Greens
- Carrots
- Radishes
- Cucumbers
- Zucchini
Herbs
- Basil
- Parsley
- Cilantro
- Thyme
- Rosemary
- Mint (in its own box)
- Oregano
Flowers
- Marigolds
- Nasturtiums
- Zinnias
- Calendula
- Sunflowers (dwarf)
- Cosmos
- Lavender
Seasonal Maintenance Tips

Regular soil amendments keep your planter boxes productive year after year
Spring
- Add 2-3″ of fresh compost to replenish nutrients
- Check wood for any winter damage and repair as needed
- Test soil pH and amend if necessary
- Check and repair irrigation systems
Summer
- Monitor soil moisture daily during hot weather
- Apply organic mulch to retain moisture
- Harvest regularly to encourage production
- Support tall plants with stakes or cages
Fall
- Plant cool-season crops for extended harvests
- Remove spent summer plants
- Consider cover crops in unused boxes
- Check wood sealant and reapply if needed
Winter
- Add a layer of leaves or straw as insulation
- Consider season extension with cold frames
- Plan next year’s planting rotation
- Repair or build additional boxes
Watering Wisdom
Raised planter boxes dry out faster than in-ground gardens. Check soil moisture regularly by inserting your finger 2″ into the soil. If it feels dry, it’s time to water. Water deeply and less frequently to encourage deep root growth.
Creative DIY Raised Planter Box Variations

Explore different designs to match your garden style and needs
Design Variations
Elevated Planter Box

Add legs to raise your planter to waist height, eliminating bending entirely. Perfect for gardeners with mobility issues or small patios.
Tiered Planter Box

Create visual interest with multiple tiers at different heights. Great for sloped yards or for separating different plant types.
Planter with Trellis

Integrate a trellis directly into your planter box design for vertical growing space. Perfect for vining vegetables and flowers.
Material Alternatives
Non-Wood Options
- Galvanized metal: Modern look, extremely durable
- Concrete blocks: Inexpensive, easy to assemble
- Stone or brick: Beautiful, permanent option
- Recycled plastic lumber: Maintenance-free, eco-friendly
Upcycled Materials
- Old bathtubs: Charming vintage appeal
- Wooden pallets: Inexpensive (ensure they’re heat-treated)
- Wine barrels (halved): Rustic aesthetic
- Stock tanks: Farmhouse style, very durable

Alternative materials can create unique, personalized planter boxes
Troubleshooting Common DIY Raised Planter Box Issues
Why are my planter box sides bowing outward?
This happens when soil pressure pushes against the sides. Solutions include:
- Add middle supports to long sides
- Install cross-braces between opposite sides
- Use thicker lumber (2″ rather than 1″)
- Reduce box length to 6′ maximum
How can I extend the life of my wooden planter boxes?
To maximize durability:
- Use naturally rot-resistant wood like cedar or redwood
- Apply a food-safe wood sealer every 1-2 years
- Install the box slightly above ground level to prevent constant soil contact
- Ensure proper drainage to prevent wood from staying wet
- Consider lining the inside with plastic (with drainage holes)
Why are my plants not thriving in my raised planter box?
Several factors could be affecting plant health:
- Poor soil quality – add compost and organic matter
- Inadequate drainage – ensure proper drainage holes
- Insufficient watering – raised beds dry out faster than ground soil
- Incorrect sun exposure – most vegetables need 6-8 hours of sun
- Nutrient deficiency – add organic fertilizer appropriate for your plants
How do I prevent animals from digging in my planter boxes?
To protect your plants from unwanted visitors:
- Install hardware cloth on the bottom for burrowing pests
- Add a removable frame with chicken wire on top for birds and squirrels
- Place physical barriers like decorative stones around plants
- Try natural repellents like strong-smelling herbs or companion planting
- Consider motion-activated deterrents for persistent pests
Start Building Your DIY Raised Planter Boxes Today

Transform your outdoor space with beautiful, functional DIY raised planter boxes
Building your own DIY raised planter boxes is a rewarding project that pays dividends in garden productivity, accessibility, and beauty. With basic tools, quality materials, and the step-by-step guidance in this article, you can create custom planter boxes perfectly suited to your space and gardening needs.
Remember that your first planter box is just the beginning. Many gardeners start with one or two boxes and add more each season as they discover the joy and benefits of raised bed gardening. Each box you build will be easier than the last as you refine your technique and design.
Whether you’re growing vegetables for your family, creating a beautiful flower garden, or establishing an herb collection for your kitchen, raised planter boxes provide the perfect environment for plants to thrive while making gardening more accessible and enjoyable for you.
Share Your DIY Raised Planter Box Project!
We’d love to see your creations! Tag us in your social media posts or leave a comment below with photos of your finished planter boxes.
Have questions about building your own raised planter boxes? Need advice on troubleshooting an issue? Leave a comment below, and we’ll be happy to help you create the garden of your dreams!