DIY Planter Box Plans: Build Your Dream Garden Container
Creating your own planter box is one of the most rewarding DIY garden projects you can tackle. Not only will you save money compared to store-bought options, but you’ll also get the satisfaction of building something beautiful and functional with your own hands. Whether you’re looking to grow flowers, herbs, or vegetables, these customizable planter box plans will help you create the perfect growing space for your needs.
This Website contains affiliate links. That means I may earn a small commission if you purchase through my links, at no extra cost to you.
In this guide, I’ll walk you through building a versatile wooden planter box that’s perfect for beginners but looks professionally crafted. You’ll need just a few basic tools, some lumber, and a couple of hours to complete this project. Let’s get started!
Want to get started right away?
Download our free printable planter box plans with detailed measurements and cutting diagrams.
Before you begin building your planter box, gather all the necessary materials and tools. Having everything ready will make the construction process much smoother.
Materials List
(6) 1×6 Cedar boards (8 feet long) – Cedar is naturally rot-resistant and perfect for outdoor projects. Check prices on Amazon
(1) 2×2 Cedar board (8 feet long) – For corner supports
(1) Box of 1½” exterior deck screws – These resist rust and hold up to outdoor conditions. Check prices on Amazon
Safety glasses and gloves – Always protect yourself during DIY projects. Check prices on Amazon
Pro Tip: If you’re on a tight budget, you can substitute cedar with pressure-treated pine. Just make sure it’s rated for ground contact if you’re growing edible plants.
Planter Box Dimensions
For this project, we’ll be building a rectangular planter box with the following dimensions:
Length: 36 inches (3 feet)
Width: 18 inches (1.5 feet)
Height: 16 inches
These dimensions create a planter that’s large enough for most plants but not so big that it becomes unwieldy. The depth allows for proper root development, which is essential for healthy plants.
Customization Note: Feel free to adjust these dimensions to fit your specific space. Just remember to recalculate your lumber needs accordingly.
Cutting List
Based on our dimensions, here’s what you’ll need to cut from your lumber:
Piece
Dimensions
Quantity
Purpose
Side Panels
1×6 × 36″
6
Long sides of the planter (3 boards high on each side)
End Panels
1×6 × 18″
6
Short sides of the planter (3 boards high on each end)
Corner Supports
2×2 × 16″
4
Internal corner supports
Bottom Slats
1×6 × 17″
3
Bottom of the planter with gaps for drainage
Measuring Tip: Remember the carpenter’s rule: “Measure twice, cut once.” Double-check all measurements before making any cuts to avoid wasting materials.
Step-by-Step Building Instructions
Step 1: Cut All Your Lumber
Using your circular saw or miter saw, cut all the boards according to the cutting list above. Make sure to measure carefully and mark your cut lines clearly. Always wear safety glasses when cutting wood.
After cutting, lightly sand all edges to remove any splinters or rough spots. This will make the assembly process safer and give your finished planter a more professional look.
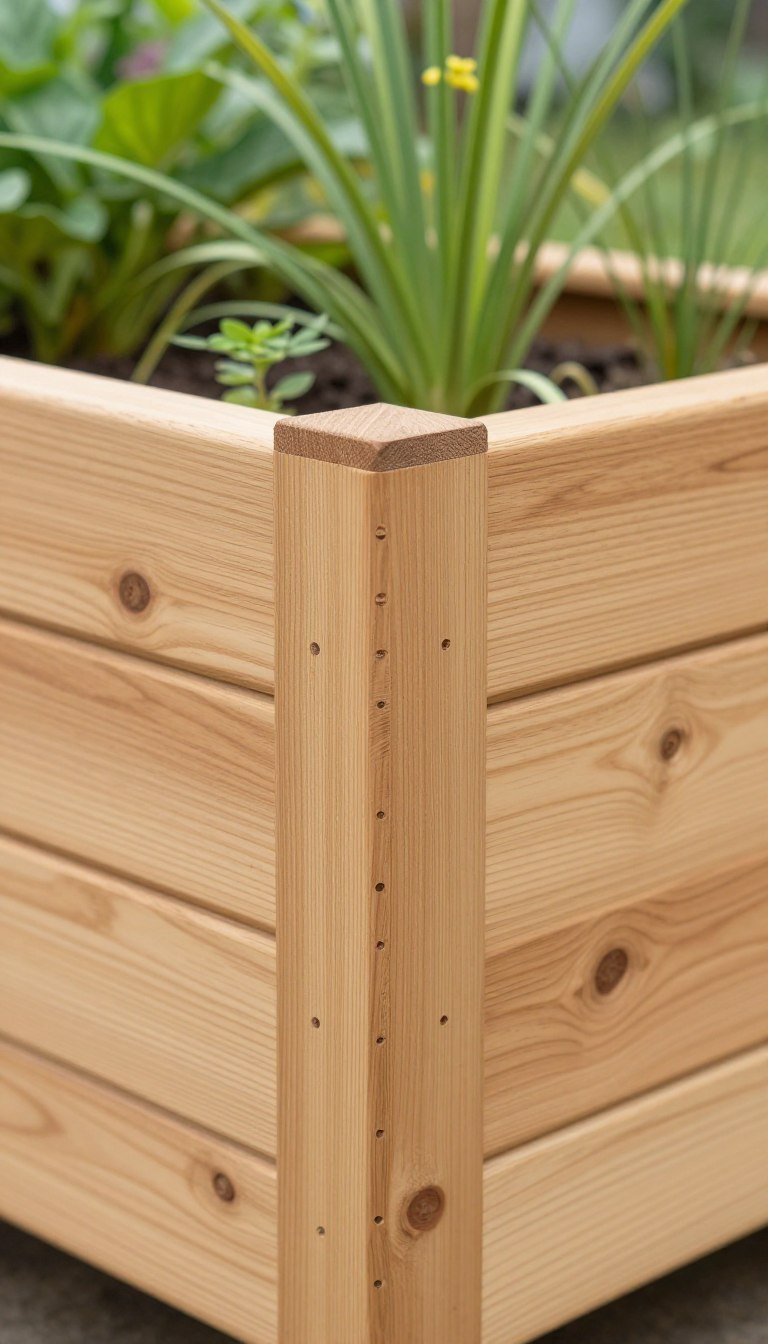
Step 2: Assemble the Corner Supports
The corner supports form the internal structure of your planter box. Position your four 2×2 posts at the corners of where your planter will be. These will serve as the attachment points for your side and end panels.
Step 3: Attach the Side Panels
Start by attaching the bottom row of side panels to the corner supports. Place the first 36″ side panel against two corner supports, ensuring it’s flush with the bottom of the supports. Pre-drill holes to prevent the wood from splitting, then secure with screws.
Repeat this process for the opposite side, then attach the 18″ end panels in the same manner. Make sure everything is square as you go.
Step 4: Add the Second and Third Rows
Continue building up the sides of your planter by adding the second and third rows of boards. Stagger the joints between the side and end panels for added strength. This creates a more stable structure that will hold up better over time.
Check that everything remains square and level as you add each new row. Use a level if you have one available.
Step 5: Install the Bottom Slats
Flip your planter box over and install the bottom slats. Space the three 17″ boards evenly across the bottom, leaving about ¼” gaps between them for drainage. Secure each slat with screws into the bottom row of side panels.
The gaps between slats are crucial for proper drainage, which prevents root rot and keeps your plants healthy.
Step 6: Add Drainage Holes (Optional)
For even better drainage, drill a few ½” holes in each of the bottom slats. This ensures that excess water can easily escape, preventing waterlogged soil that can damage plant roots.
Step 7: Line with Landscaping Fabric
Cut a piece of landscaping fabric large enough to cover the bottom and extend a few inches up the sides. This will help retain soil while still allowing water to drain through. Secure the fabric to the inside of the planter using a staple gun.
Make sure to cut small slits in the fabric where it covers the drainage holes to maintain proper water flow.
Step 8: Sand and Finish (Optional)
For a more polished look and added durability, sand all exterior surfaces of your planter box. Start with medium-grit sandpaper (80-100) and finish with fine-grit (120-150) for a smooth surface.
After sanding, apply a wood sealer, stain, or exterior paint of your choice. This step is optional but will significantly extend the life of your planter box, especially if you’re using pine instead of cedar.
“The best time to seal your planter box is before you add soil. This allows you to reach all surfaces easily and ensures complete protection.”
Filling and Planting Your Box
Creating the Perfect Growing Environment
Now that your planter box is built, it’s time to create the perfect environment for your plants to thrive:
Place your planter box in its final location before filling it with soil, as it will become quite heavy.
Add a 1-2 inch layer of gravel or broken pottery pieces at the bottom for additional drainage.
Fill the box about ¾ full with high-quality potting soil designed for container gardening.
Mix in compost or slow-release fertilizer to provide nutrients for your plants.
Plant your chosen flowers, herbs, or vegetables according to their specific spacing requirements.
Water thoroughly after planting to help settle the soil around the roots.
Plant Selection Tips
When choosing plants for your new planter box, consider these factors:
For Flowers
Mix heights and colors for visual interest
Include trailing plants for the edges
Group plants with similar water needs
For Vegetables/Herbs
Consider companion planting benefits
Place taller plants at the back
Group by watering and sun requirements
Planter Box Variations and Ideas
Once you’ve mastered the basic planter box, consider these creative variations to expand your garden:
Tiered Planter
Create a stepped design with multiple planting areas at different heights. Perfect for small spaces and visual interest.
Planter with Trellis
Add a trellis to the back of your planter for growing climbing vegetables like cucumbers, peas, or ornamental vines.
Rolling Planter
Install heavy-duty casters on the bottom of your planter to make it mobile. Great for adjusting to sunlight or clearing space for entertaining.
Inspiration Tip: Browse Pinterest for more planter box ideas and variations. Save your favorites to a dedicated board for future projects!
Maintaining Your Planter Box
With proper care, your DIY planter box can last for many years. Here are some maintenance tips to extend its life:
Regular Inspection: Check for loose screws or boards and tighten/repair as needed.
Annual Resealing: Apply a fresh coat of wood sealer each spring to protect against moisture.
Soil Refreshing: Replace or amend the top few inches of soil each season to replenish nutrients.
Winter Protection: In cold climates, consider emptying and storing your planter box or covering it during winter months.
Drainage Check: Periodically ensure drainage holes remain clear of debris.
“The secret to long-lasting planter boxes isn’t just in how you build them, but in how you maintain them. A little care goes a long way.”
Get Your Free Planter Box Plans
Ready to start building? Download our detailed planter box plans with precise measurements, cutting diagrams, and a complete materials list.
Download Your Free Plans Today
Get instant access to our comprehensive planter box plans and start building this weekend!
Building your own planter box is a rewarding project that adds beauty and functionality to your outdoor space. With these plans and instructions, you’ll be able to create a custom planter that perfectly fits your garden needs and aesthetic preferences.
Remember, the beauty of DIY projects is that you can customize them to make them your own. Don’t be afraid to experiment with different dimensions, finishes, or design elements to create a planter box that’s uniquely yours.
We’d love to see your finished planter box projects! Share your creations on Pinterest and tag us to showcase your DIY success. Happy building!
Ready to Get Started?
Grab your tools and materials and build your custom planter box this weekend!
Few footwear brands have achieved the iconic status of Converse shoes. From basketball courts to rock concerts, these canvas classics have walked through decades of fashion evolution while maintaining their distinctive charm. Whether you’re a longtime fan or considering your first pair, this guide will walk you through everything you need to know about these…
The moment arrives when your heart knows it’s time. You’ve found the person who makes every day brighter. Now comes one of life’s most significant decisions: planning your marriage proposal.This Website contains affiliate links. That means I may earn a small commission if you purchase through my links, at no extra cost to you. This…
In a world of fashion conformity, funky shoes are your ticket to standing out from the crowd. These statement-making footwear options aren’t just accessories – they’re expressions of personality, conversation starters, and instant mood boosters. Whether you’re drawn to vibrant colors, unexpected patterns, or avant-garde designs, the right pair of funky shoes can transform even…
When it comes to blending style, comfort, and versatility, cute Adidas shoes have become the ultimate fashion staple for trendsetters everywhere. From the iconic three stripes to the perfect balance of athletic heritage and fashion-forward design, Adidas continues to create footwear that captures hearts (and Pinterest boards!) worldwide. Whether you’re looking for a casual everyday…
Your front porch is the first impression visitors have of your home, and the right planters can transform this space from ordinary to extraordinary. Whether you have a sprawling wraparound porch or just a small stoop by your front door, creative front porch planter ideas can dramatically enhance your home’s curb appeal and create a…
As winter fades and the first hints of warmth touch the air, it’s time to welcome spring with vibrant container gardens that celebrate the season’s renewal. Whether you have a sprawling garden or just a tiny balcony, spring planters offer endless possibilities to express your creativity and bring nature’s beauty to any space. From repurposed…