How to Draw Shoes: A Comprehensive Guide for Artists of All Levels
Learning how to draw shoes is an essential skill for artists interested in fashion illustration, character design, or simply expanding their drawing repertoire. Shoes add personality and context to your artwork, whether you’re creating a fashion portfolio, designing characters, or practicing everyday objects. This comprehensive guide will walk you through the process of drawing various shoe styles with techniques suitable for beginners and intermediate artists alike.
Drawing shoes might seem challenging at first due to their complex shapes and details, but with the right approach and practice, you’ll be sketching impressive footwear in no time. Let’s step into the world of shoe illustration and discover how to create realistic, stylish shoe drawings that will enhance your artistic skills.
Why Learning How to Draw Shoes Is Valuable for Artists
Mastering how to draw shoes offers numerous benefits for artists across various disciplines. For fashion illustrators, shoe drawing skills are indispensable for creating complete outfit designs and fashion plates. Character designers need to understand footwear to establish personality, occupation, and era for their creations.
Portfolio development is another key reason to learn shoe drawing. A diverse portfolio that includes well-executed shoe illustrations demonstrates versatility and attention to detail—qualities that art directors and clients value highly. Additionally, shoes present interesting technical challenges in perspective, proportion, and texture rendering that will strengthen your overall drawing abilities.
Perhaps most importantly, shoes tell stories. A worn pair of hiking boots, elegant stilettos, or casual sneakers each communicate something different about their wearer. By learning to draw shoes effectively, you add a powerful storytelling element to your artistic toolkit.
Essential Materials for Drawing Shoes
Before we begin our shoe drawing journey, let’s gather the right tools. Having quality materials will make the learning process more enjoyable and help you achieve better results.
Recommended Drawing Materials
For best results, I recommend having these basic supplies:
Before diving into drawing techniques, let’s explore the main shoe categories you’ll likely want to illustrate. Each type has distinctive characteristics that influence how you’ll approach drawing them.
Sneakers/Athletic Shoes
Characterized by rubber soles, fabric uppers, and often complex patterns and lacing systems. Sneakers typically have rounded toes and cushioned designs.
Heels
Distinguished by elevated heels of varying heights. Categories include stilettos (thin, high heels), block heels (thicker, more stable), and kitten heels (shorter height).
Boots
Extending above the ankle, boots come in many styles: ankle boots, knee-high boots, combat boots, and more. They often feature laces, zippers, or buckles.
Flats
Low-profile shoes without heels, including ballet flats, loafers, and slip-ons. They typically have simple, elegant lines.
Sandals
Open shoes with straps or thongs that expose much of the foot. Styles range from flip-flops to gladiator sandals with multiple straps.
Formal Shoes
Including oxfords, derbies, and brogues. These typically have leather uppers, subtle heels, and often feature decorative perforations or cap toes.
Understanding these basic categories will help you identify the key features to emphasize when drawing different shoe styles. Now, let’s learn the fundamental approach to drawing any shoe.
The Shoe Last Technique: The Secret to Drawing Any Shoe
Professional shoe designers and illustrators use a powerful technique called the “Shoe Last” method. A shoe last is essentially a simplified form of a foot that serves as a template for designing shoes. This approach is the foundation for drawing any type of shoe accurately.
What is a Shoe Last?
A shoe last is a three-dimensional form that mimics the shape of a human foot. Shoemakers use physical lasts to construct shoes, while illustrators use the concept as an underlying structure for their drawings. By starting with this form, you ensure your shoe drawings will have realistic proportions and volume.
The Two-Step Process
Step 1: Draw the Sole Line
Begin by drawing the outline of the sole. This curved line defines the entire shape of the shoe and provides the foundation for everything else. Pay attention to the arch and how the line curves—this varies depending on the shoe type.
Step 2: Build the Last Shape
Using the sole line as your base, draw the simplified foot form above it. This doesn’t need to be anatomically perfect—just a basic shape that captures the volume where a foot would be inside the shoe.
Pro Tip: Always start with the shoe last before adding any design details. This approach works for any shoe style and ensures proper proportions from the beginning.
Once you’ve established the last, you can begin adding the specific design elements of your shoe. The last serves as a guide that helps you maintain correct proportions and a realistic sense of volume as you add details.
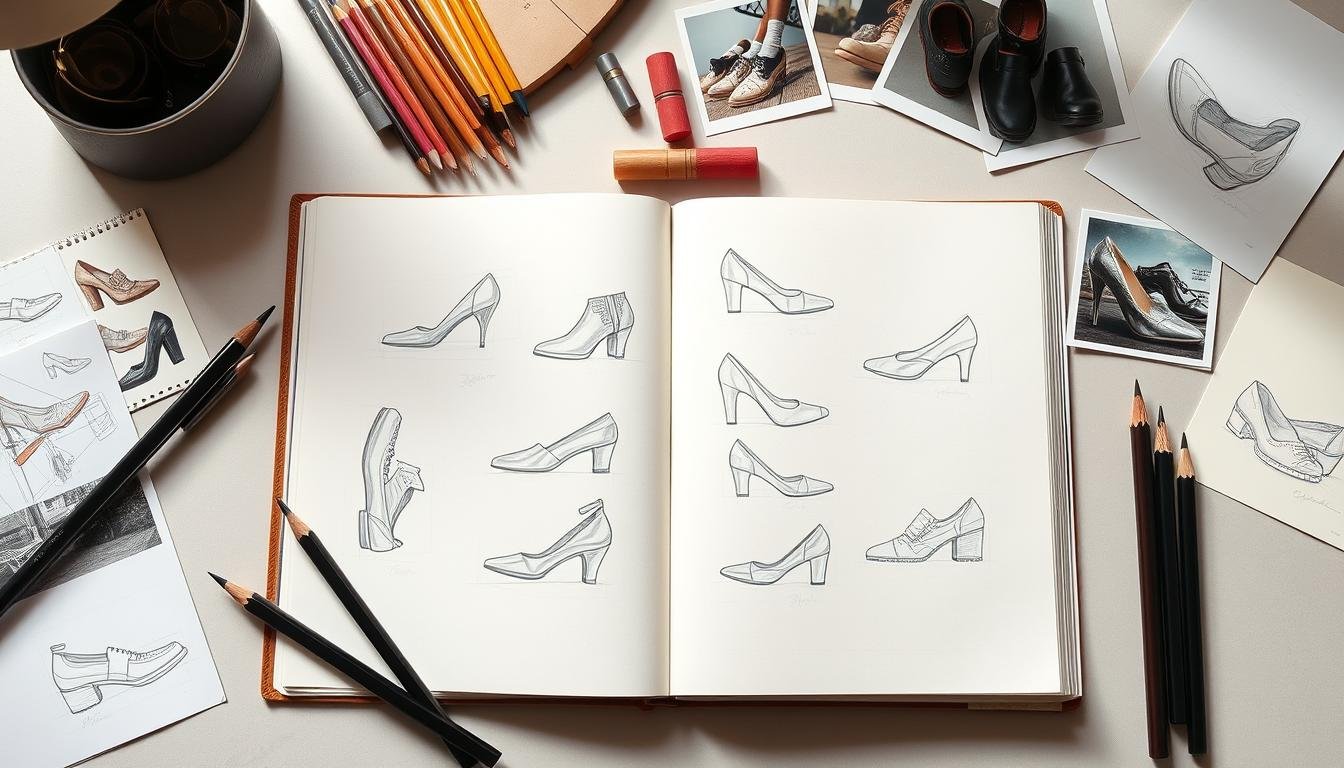
Step-by-Step Tutorial: How to Draw Sneakers
Let’s apply the shoe last technique to draw a classic athletic sneaker. Follow these steps to create a realistic sneaker drawing.
Draw the sole line: Start with a curved line that represents the bottom of the shoe. For sneakers, this line should have a slight arch in the middle and curve up at the toe and heel.
Sketch the shoe last: Above the sole line, draw the simplified foot form. For sneakers, this should be rounded at the toe and narrower at the heel.
Outline the upper: Using the last as your guide, draw the outline of the sneaker’s upper portion. Leave space for the sole thickness below your initial sole line.
Add the main panels: Most sneakers have distinct panels. Add these sections, typically including a toe cap, side panels, and heel counter.
Draw the lacing system: Add the tongue area and laces. For sneakers, the tongue often protrudes slightly above the rest of the shoe.
Add details: Include eyelets for the laces, stitching lines between panels, and any brand logos or decorative elements.
Refine the sole: Add more detail to the sole, including tread patterns and any midsole design features.
Add shading: Use light shading to give your sneaker volume and dimension. Pay attention to how light would hit the different surfaces.
Perfect Your Shading Technique
Quality blending tools make a huge difference in creating realistic textures:
Share Your Progress! Take a photo of your sneaker drawing and pin it to Pinterest to inspire others. Tag it with #HowToDrawShoes to join our community of artists!
Step-by-Step Tutorial: How to Draw High Heels
High heels present unique challenges due to their elevated design and elegant curves. Let’s walk through the process of drawing a classic stiletto heel.
Draw the sole line with heel position: Start with a curved line that has a pronounced arch. Mark where the heel will connect to the sole.
Sketch the shoe last at an angle: For heels, the foot form sits at an angle, with the heel elevated and the toes pointed downward.
Draw the heel: Add a thin vertical line for a stiletto heel, or a thicker shape for a block heel. Connect it to your sole line at the marked position.
Outline the upper: Using the angled last as your guide, draw the upper portion of the shoe. High heels typically have a pointed or rounded toe and a low-cut opening.
Add details: Include any straps, buckles, or decorative elements. For classic pumps, the upper is typically smooth and minimal.
Refine the sole and heel: Add thickness to the sole and detail to the heel, including the heel cap at the bottom.
Add shading: Use shading to emphasize the curves and create a sense of material. Leather shoes often have subtle highlights and shadows.
“A shoe is not only a design, but it’s a part of your body language, the way you walk. The way you’re going to move is quite dictated by your shoes.”
– Christian Louboutin
Capture Fine Details
For the delicate lines in high heel drawings, precision tools are essential:
Boots extend above the ankle, adding complexity to your drawing. We’ll focus on drawing ankle boots, but the same principles apply to taller styles.
Draw the sole line: Start with the curved line representing the bottom of the boot. For most boots, this curve is less pronounced than sneakers.
Sketch the shoe last plus ankle: Draw the foot form, but extend it upward to include the ankle area where the boot will rise.
Outline the boot shape: Draw the overall silhouette, including the shaft height (how far the boot extends up the leg).
Add the heel: Most boots have some heel height. Add this structure, considering whether it’s a flat heel, stacked heel, or another style.
Draw closures and details: Add zippers, laces, buckles, or pull tabs depending on the boot style you’re creating.
Add texture details: Include stitching, seams, and any decorative elements specific to your boot design.
Refine the sole edge: Add thickness and detail to the sole, including any tread pattern visible from the side view.
Add shading: Use shading to create volume and define the material texture. Leather boots often have creases around the ankle area.
Material Matters: Different boot materials create different textures. Leather has smooth surfaces with occasional wrinkles, suede has a soft, matte appearance, and rubber has a glossy finish. Adjust your shading technique accordingly!
Erase with Precision
Quality erasers help refine details and create highlights:
Skipping the shoe last: Trying to draw the shoe directly without establishing the underlying structure
Flat drawings: Not creating enough volume and dimension in your shoe illustrations
Inconsistent perspective: Drawing different parts of the shoe from different angles
Disproportionate features: Making the toe too long or the heel too short
Ignoring the sole thickness: Drawing the sole as a single line rather than a form with volume
Overlooking material properties: Not adjusting your shading technique for different shoe materials
How to Correct Them
Always start with structure: Use the shoe last technique for every drawing
Think in 3D: Visualize the shoe as a three-dimensional object as you draw
Maintain consistent viewpoint: Decide on your perspective before starting and stick with it
Use references: Study real shoes to understand proper proportions
Draw soles with thickness: Represent the sole as having volume, not just as an outline
Study materials: Observe how light interacts with different shoe materials
Quick Fix: If your shoe drawing looks flat, add stronger shadows under the shoe and in the inner areas. This simple technique immediately creates a sense of the shoe resting on a surface.
Advanced Techniques: Adding Texture and Details
Once you’ve mastered the basic structure of shoe drawing, you can elevate your illustrations with these advanced techniques for adding realistic textures and details.
Creating Realistic Textures
Leather
For smooth leather, use light, even shading with occasional creases at flex points. For patent leather, leave strong highlights to create a glossy effect.
Suede
Create a soft, velvety appearance using stippling (small dots) or very short, random strokes with a softer pencil (4B or 6B).
Canvas
Draw a subtle cross-hatch pattern to suggest the woven texture of canvas material. Keep the lines light and consistent.
Rubber
For rubber soles, use smooth shading with sharp edges and occasional surface imperfections. Add tread patterns with precise, geometric shapes.
Mastering Key Details
Laces
Draw laces as thin strips that overlap in a consistent pattern. Pay attention to how they thread through eyelets and how they create tension and volume.
Stitching
Represent stitching with small, evenly spaced dashes or dots along seam lines. For decorative stitching, make these more pronounced.
Hardware
For buckles, zippers, and metal details, use strong contrast between highlights and shadows to create a metallic appearance.
Patterns and Logos
When adding patterns or brand logos, first sketch them lightly and ensure they follow the contours of the shoe surface to maintain proper perspective.
Capture Every Detail
A complete set of drawing tools helps you create every texture:
Want to take your shoe artistry to the next level? Try drawing directly on canvas shoes to create wearable art! This fun project allows you to apply your drawing skills to create unique, personalized footwear.
Choose the right shoes: Start with plain white canvas shoes. Higher quality shoes will last longer and take designs better.
Plan your design: Sketch your ideas on paper first. Consider how the design will wrap around the curved surface of the shoe.
Prepare the shoes: Clean the canvas with a damp cloth and let dry completely. For best results, use a primer designed for fabric.
Transfer basic outlines: Lightly sketch your design on the shoes with pencil before adding permanent media.
Add color and details: Use permanent markers, fabric paints, or specialized shoe painting pens to add color and details.
Seal your work: Apply a waterproof sealer made for fabric to protect your design from wear and weather.
Safety Tip: Always work in a well-ventilated area when using permanent markers or fabric sealants. Allow ample drying time between steps.
Practice Ideas to Improve Your Shoe Drawing Skills
Consistent practice is the key to mastering shoe illustration. Here are some effective exercises to improve your skills:
Daily Shoe Sketch
Draw one shoe each day, even if it’s just a quick 5-minute sketch. Over time, you’ll see significant improvement in your speed and accuracy.
Angle Challenge
Draw the same shoe from multiple angles: side view, three-quarter view, front view, and top view. This builds your understanding of the shoe’s 3D form.
Detail Focus
Practice drawing specific shoe components: just laces, just soles, just buckles. These focused studies will improve your detail work.
Material Studies
Draw the same shoe style in different materials: leather, canvas, suede, patent leather. Focus on how textures change the appearance.
Speed Sketching
Set a timer for 2-5 minutes and sketch shoes quickly. This helps you identify and capture the most essential elements first.
Shoe Collection
Create a “shoe wardrobe” page in your sketchbook with different styles drawn to the same scale, as if for a single character or collection.
Pinterest Challenge: Create a “How to Draw Shoes” board on Pinterest. Save inspiring shoe drawings and tutorials, then practice recreating your favorites. Share your own progress drawings with #HowToDrawShoes!
Conclusion: Step Forward with Your Shoe Drawing Skills
Learning how to draw shoes opens up exciting possibilities for your artistic journey. Whether you’re interested in fashion design, character development, or simply expanding your drawing repertoire, shoe illustration is a valuable skill that combines technical understanding with creative expression.
Remember that the key to improvement is consistent practice and patience. Start with the fundamental shoe last technique, focus on accurate proportions, and gradually add more detail and texture as your confidence grows. Don’t be discouraged by initial challenges—even professional illustrators began with basic shapes and simple lines.
As you continue developing your shoe drawing skills, experiment with different styles, materials, and perspectives. Each new shoe you draw will build upon your knowledge and refine your technique. Consider creating a dedicated sketchbook for your shoe studies to track your progress over time.
Now it’s your turn to put pencil to paper and start drawing amazing shoes! Share your creations on Pinterest with #HowToDrawShoes to inspire others and connect with fellow artists on the same journey.
Ready to Start Drawing?
Get all the supplies you need to begin your shoe drawing journey:
Blue shoes are the unsung heroes of a versatile wardrobe. They offer the perfect balance of boldness and versatility, allowing you to make a statement without overwhelming your outfit. Whether you’re sporting navy loafers, cobalt heels, or powder blue sneakers, this guide will help you create eye-catching blue shoes outfits for every occasion and season….
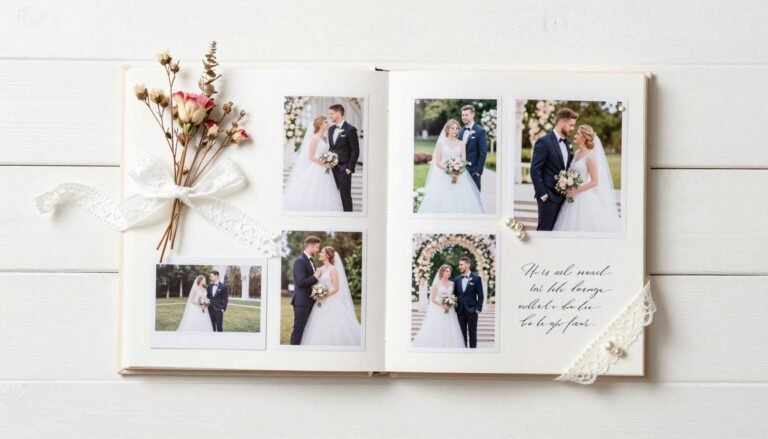
Your wedding day flies by in a beautiful blur of emotions and memories. A wedding scrapbook transforms those fleeting moments into a tangible treasure you can hold and revisit for years to come. Unlike digital photos that sit forgotten on devices, a handcrafted scrapbook album tells your love story through carefully chosen photos, meaningful embellishments,…
Every love story deserves a beautiful chapter. A book themed bridal shower celebrates the bride’s journey while honoring her passion for literature. This timeless theme transforms an ordinary gathering into an extraordinary celebration filled with literary charm and personal meaning. Planning such a special event requires creativity and attention to detail. From vintage book centerpieces…
A covered outdoor patio creates the perfect bridge between indoor comfort and outdoor beauty. Whether you’re looking to escape the summer sun, enjoy a gentle rain without getting soaked, or extend your outdoor season well into fall, the right patio cover can transform your backyard into a true outdoor living room that’s usable year-round. In…
A well-lit closet can transform your daily routine from frustrating to fantastic. No more squinting to tell navy from black or searching endlessly for that missing shoe! The right closet lighting ideas can make your space feel larger, showcase your favorite pieces, and make getting ready a breeze. Whether you have a spacious walk-in or…
Growing your own herbs brings a special joy to cooking and gardening alike. Whether you have a sprawling backyard or just a tiny apartment windowsill, there’s a herb planter idea perfect for your space. Fresh herbs add vibrant flavors to your meals and delightful fragrances to your home. We’ve gathered 30 inspiring herb planter ideas…